

If you love lemon desserts, this Lemon Chiffon Pie is a beautiful treat to add to your baking collection. It features a delicate, flaky gluten-free crust filled with homemade lemon curd folded together with fluffy whipped egg whites. The result is a light, airy filling with a bright citrus flavor and just the right amount of sweetness.
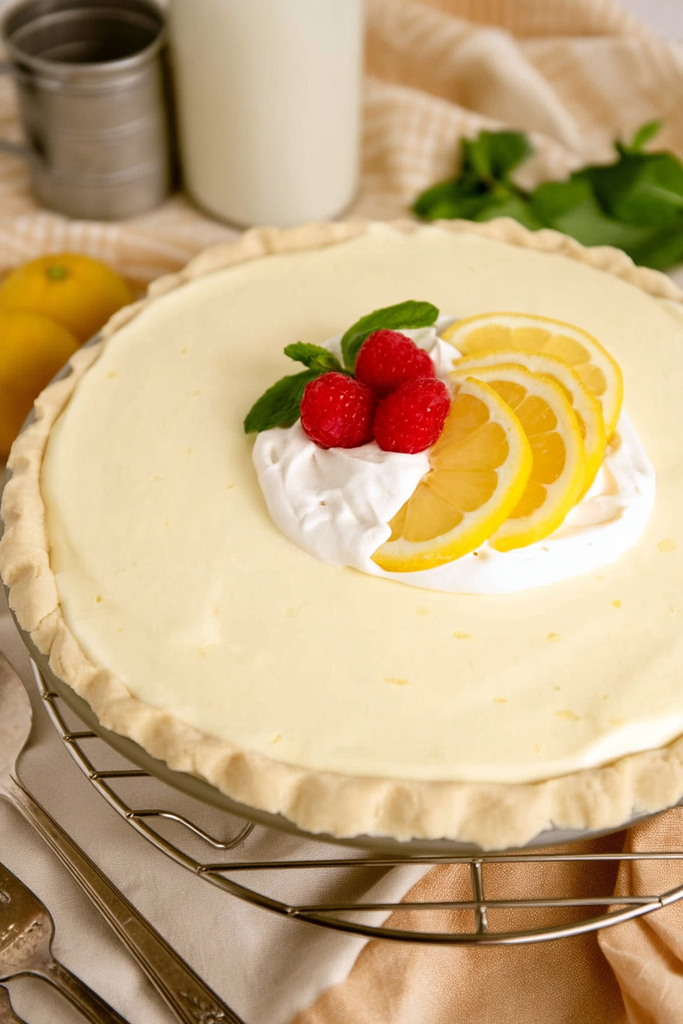
Unlike traditional lemon meringue pie, this chiffon pie has a soft, mousse-like filling that’s chilled until set rather than baked. A generous topping of whipped cream adds a creamy finish, while fresh lemon slices, raspberries, and mint leaves make it look especially lovely for serving.
This pie is perfect for spring gatherings, summer celebrations, Easter brunch, or whenever you’re craving a refreshing homemade dessert. You can prepare it ahead of time and let it chill in the refrigerator, making it a convenient choice for entertaining.
Why You’ll Love This Lemon Chiffon Pie
- Light and airy filling: Folded-in whipped egg whites give the lemon curd a delicate, fluffy texture.
- Bright lemon flavor: Fresh lemon juice and zest create a refreshing citrus taste that balances the sweetness.
- Gluten-free crust option: The homemade crust uses gluten-free flour, making it a lovely dessert option for those avoiding gluten.
- No-bake filling: Once the crust is baked and cooled, the lemon filling sets in the refrigerator without needing additional oven time.
- Perfect make-ahead dessert: The pie can chill for at least three hours or overnight, so it’s easy to prepare before a gathering.
- Beautiful presentation: Whipped cream, raspberries, lemon slices, and mint create a fresh, colorful finish.
Ingredients You’ll Need
This recipe has four main components: the crust, lemon curd, meringue, and garnish. Each one contributes to the pie’s delicate texture and refreshing flavor.
For the Gluten-Free Crust
- Gluten-free flour: Forms the base of the homemade pie crust. The original recipe uses King Arthur gluten-free flour.
- Xanthan gum: Helps bind the gluten-free dough and gives it structure, helping it hold together when rolled and baked.
- Baking powder: Adds a little lift to the crust.
- Salt: Balances the sweetness and enhances the buttery flavor.
- Powdered sugar: Sweetens the crust and contributes to a tender texture.
- Cold unsalted butter: Creates richness and helps form a flaky, tender crust. Keep it cold and cut it into cubes before mixing.
- Ice water: Brings the dough together without warming the butter too much.
Shortcut: You can use a store-bought pie crust instead if you want to save time. If you don’t need a gluten-free crust, a regular homemade pie crust also works.
For the Lemon Curd
- Unflavored gelatin: Helps the lemon filling set while chilling, giving it enough structure to hold its airy texture.
- Granulated sugar: Sweetens the filling and balances the tartness of the lemon.
- Salt: Brings out the citrus flavor and balances the sweetness.
- Fresh lemon juice: Provides the bright, tangy flavor that makes this pie so refreshing.
- Water: Helps form the lemon curd mixture.
- Egg yolks: Add richness, color, and a smooth custard-like texture.
- Lemon zest: Adds fragrant citrus oils for a stronger lemon flavor.
For the Meringue
- Egg whites: Whipped until stiff peaks form, then folded into the chilled lemon curd to create the light chiffon texture.
- Granulated sugar: Sweetens the meringue and helps stabilize the whipped egg whites.
For the Garnish
- Whipped cream: Adds a creamy, soft topping. Non-dairy whipped topping, such as CocoWhip, can be used if you prefer a dairy-free garnish.
- Lemon slices: Give the pie a fresh citrus finish and make a pretty decoration.
- Fresh raspberries: Add a pop of color and a sweet-tart contrast to the lemon filling.
- Mint leaves: Bring a fresh green accent to the finished pie.
How to Make Lemon Chiffon Pie
The crust is baked separately, while the lemon filling is prepared on the stovetop and finished with fluffy meringue. Once assembled, the pie needs several hours in the refrigerator to set properly.
Step 1: Prepare the Gluten-Free Pie Crust
Preheat the oven to 375°F.
Add the gluten-free flour, xanthan gum, baking powder, salt, and powdered sugar to a food processor. Pulse a few times until the dry ingredients are combined.
With the processor running, gradually add the cold cubed butter. Then add the ice water and continue mixing just until a ball of dough forms.
Transfer the dough to a work surface and shape it into a large ball. Cut the dough in half. Wrap one half in a zip-top freezer bag and store it in the freezer for another recipe.
Place the remaining dough between two sheets of waxed paper. Roll it into a 12-inch circle, keeping the thickness as even as possible.
Carefully transfer the dough to a pie plate. Press it gently into the bottom and sides, then crimp the edges.
Bake for 10–12 minutes, or until the edges are slightly light golden brown. Remove from the oven and let the crust cool completely before adding the filling.
Step 2: Make the Lemon Curd
In a medium heavy-bottomed saucepan, combine the unflavored gelatin, granulated sugar, salt, egg yolks, lemon juice, and water.
Place the saucepan over medium heat. Stir constantly until the mixture comes to a boil.
Stir in the lemon zest, then remove the saucepan from the heat.
Transfer the mixture to the refrigerator and chill for approximately 30–40 minutes, stirring occasionally. The goal is to let the lemon curd thicken and begin to set slightly without becoming completely firm.
Step 3: Whip the Egg Whites
While the lemon curd chills, place the egg whites in a clean mixing bowl. Gradually add the granulated sugar and beat with an electric mixer until stiff peaks form.
For those concerned about using uncooked egg whites, the original recipe includes a heating option: place the egg whites and sugar in a heatproof bowl set over a pan of boiling water. Whisk constantly for 90 seconds, then remove the bowl from the heat and beat the mixture until stiff peaks form.
For additional food safety, use pasteurized egg whites and follow their package instructions, or use a tested cooked-meringue method with a food thermometer. The original 90-second heating instruction alone does not guarantee that the mixture reaches a safe temperature.
Step 4: Fold the Meringue into the Lemon Curd
Remove the slightly chilled lemon curd from the refrigerator.
Add the whipped egg whites to the lemon mixture and gently fold them together with a spatula. Use slow, sweeping movements, lifting the mixture from the bottom of the bowl and folding it over the top.
Continue until the meringue is evenly incorporated. Be gentle and avoid stirring vigorously, as this can deflate the egg whites and make the filling less airy.
Step 5: Fill and Chill the Pie
Pour the lemon chiffon filling into the completely cooled pie crust.
Smooth the top with a spatula, then place the pie in the refrigerator. Chill for at least 3 hours or overnight, until the filling is set.
Don’t rush this step. The gelatin needs enough time to firm up the filling so the pie can be sliced neatly.
Step 6: Add the Whipped Cream and Garnish
Once the filling has set, spread or pipe whipped cream over the top of the pie.
Finish with fresh lemon slices, raspberries, and mint leaves for a bright, colorful presentation.
Keep the pie refrigerated until you’re ready to serve.

Tips for Making the Best Lemon Chiffon Pie
- Keep the butter cold: Cold butter is essential for a tender, flaky gluten-free crust. Avoid letting it soften before mixing.
- Don’t overwork the dough: Mix only until the dough comes together. Excessive mixing can make the crust tougher.
- Roll between sheets of waxed paper: Gluten-free dough can be delicate and may stick or crack. Rolling it between two sheets makes it easier to handle.
- Cool the crust completely: Adding the filling to a warm crust can affect its texture and make the filling soften.
- Stir the lemon curd while it chills: Occasional stirring helps it thicken evenly and prevents it from setting too firmly in one area.
- Whip the egg whites to stiff peaks: Properly whipped egg whites are important for creating the light, airy chiffon texture.
- Fold gently: Use a spatula and slow movements to preserve as much air as possible in the meringue.
- Allow enough chilling time: Refrigerate the pie for at least three hours, or overnight, so the gelatin can set the filling.
- Add the garnish before serving: Whipped cream and fresh fruit look their best when added close to serving time.
Equipment Needed
A few everyday kitchen tools are all you need to make this refreshing pie.
- Food processor (or mixing bowl and pastry cutter)
- Measuring cups and spoons
- Kitchen scale (optional, for measuring flour accurately)
- Rolling pin
- Waxed paper
- 9-inch pie plate
- Medium heavy-bottomed saucepan
- Whisk
- Mixing bowls
- Electric hand mixer or stand mixer
- Silicone spatula
- Cooling rack
- Refrigerator
- Piping bag (optional, for decorating with whipped cream)
Lemon Chiffon Pie Variations
This pie is easy to adapt with different crusts, toppings, and citrus flavors.
1. Classic All-Purpose Flour Crust
If you don’t need a gluten-free dessert, use your favorite homemade pie crust made with all-purpose flour. A traditional flaky crust pairs beautifully with the light lemon filling.
2. Dairy-Free Lemon Chiffon Pie
Use a suitable dairy-free pie crust and finish the pie with a non-dairy whipped topping, such as CocoWhip. Check the ingredients of your crust and topping to make sure they meet your dietary needs.
3. Lemon Raspberry Chiffon Pie
Add fresh raspberries to the top of the pie along with the whipped cream. Their sweet-tart flavor complements the lemon filling, and their bright color makes the dessert especially pretty.
4. Mixed Citrus Chiffon Pie
For a slightly different citrus flavor, replace a portion of the lemon juice with fresh orange juice. Keep the overall liquid proportions consistent, and add a little orange zest for extra fragrance.
5. Extra Lemon Whipped Cream Topping
For an even stronger citrus finish, gently fold a little finely grated lemon zest into the whipped cream before spreading or piping it over the chilled pie.
What to Serve with Lemon Chiffon Pie
Lemon Chiffon Pie is light, creamy, and refreshing, so it pairs well with simple drinks and fresh fruit.
- Fresh berries: Strawberries, raspberries, and blueberries add natural sweetness and a lovely contrast to the lemon.
- Fresh fruit salad: A bowl of seasonal fruit makes a light accompaniment for spring and summer gatherings.
- Hot tea: Earl Grey, green tea, or chamomile pairs nicely with the bright citrus flavor.
- Coffee: A cup of coffee balances the sweetness and makes this pie a lovely afternoon dessert.
- Vanilla tea or herbal tea: A mild, fragrant tea lets the lemon flavor shine without overpowering it.
Frequently Asked Questions
What is the difference between lemon chiffon pie and lemon meringue pie?
Both pies feature lemon and whipped egg whites, but their textures and preparation are different. Lemon meringue pie typically has a cooked lemon filling topped with meringue that is baked or browned. Lemon chiffon pie has whipped egg whites folded into the lemon filling, creating a light, airy texture. It is then chilled in the refrigerator until set.
Does Lemon Chiffon Pie need to be refrigerated?
Yes. The filling contains gelatin and whipped egg whites, so the pie should be kept refrigerated. Store it covered in the refrigerator and avoid leaving it at room temperature for extended periods.
Can I make Lemon Chiffon Pie ahead of time?
Absolutely! This pie is a great make-ahead dessert. Prepare it the day before and refrigerate overnight so the filling has plenty of time to set. For the freshest appearance, add the whipped cream and fruit garnish shortly before serving.
Can I use a store-bought pie crust?
Yes. A store-bought crust is a convenient shortcut if you don’t want to make the gluten-free crust from scratch. Choose a gluten-free option if you need the finished dessert to remain gluten-free, and prepare the crust according to its package directions.
How do I know when the lemon filling is ready?
The lemon curd should thicken slightly during its 30–40-minute chill, but it shouldn’t be completely firm before you fold in the meringue. After the filling is added to the crust, refrigerate the pie for at least three hours or overnight until it is set enough to slice.
Can I use a dairy-free whipped topping?
Yes. The original recipe uses CocoWhip, a non-dairy whipped topping. You can use your preferred dairy-free alternative if you want to avoid dairy in the garnish. Check the crust and other ingredients separately if you need the entire dessert to be dairy-free.
How long does Lemon Chiffon Pie last?
The pie can be stored in the refrigerator for up to three days. Keep it covered to protect the filling and prevent it from absorbing other refrigerator odors.
Final Thoughts
This Lemon Chiffon Pie is a wonderful dessert when you want something sweet, refreshing, and a little different from a traditional baked pie. The homemade lemon curd gives it a bright citrus flavor, while the folded-in egg whites create a soft, airy filling that feels light with every bite.
Finished with whipped cream, fresh raspberries, lemon slices, and mint, it’s a beautiful dessert for holidays, family dinners, and warm-weather celebrations. Prepare it ahead, let it chill until perfectly set, and enjoy a slice of homemade lemon goodness!
If you make this Lemon Chiffon Pie, leave a star rating and review to share how it turned out. I’d love to hear how you chose to garnish yours!
Print
Lemon Chiffon Pie: Light, Airy, and Refreshingly Creamy
- Total Time: 30 minutes
- Yield: 10 servings
Description
Lemon Chiffon Pie features a light, airy, no-bake lemon filling made with homemade lemon curd folded together with stiffly beaten egg whites. The fluffy filling is poured into a baked gluten-free crust, chilled until set, and topped with whipped cream, fresh lemon slices, raspberries, and mint.
Ingredients
For the Crust
- 2 1/4 cups gluten-free flour
- 1 teaspoon xanthan gum
- 1/2 teaspoon baking powder
- 1/2 teaspoon salt
- 1/2 cup powdered sugar
- 10 tablespoons unsalted butter, cold and cubed
- 5 tablespoons ice water
For the Lemon Curd
- 1 envelope unflavored gelatin
- 1/2 cup granulated sugar
- 1/2 teaspoon salt
- 1/2 cup lemon juice
- 1/2 cup water
- 4 egg yolks
- 1 teaspoon lemon zest
For the Meringue
- 4 egg whites
- 1/2 cup granulated sugar
For the Garnish
- 1 cup whipped cream (or non-dairy whipped topping)
- Lemon slices
- Fresh raspberries
- Mint leaves
Instructions
For the Crust
- If preferred, use a store-bought pie crust to simplify the recipe. The homemade crust is gluten-free.
- Place the gluten-free flour, xanthan gum, baking powder, salt, and powdered sugar in a food processor. Pulse a few times to combine.
- Turn on the food processor and gradually add the cold, cubed butter. Add the ice water and process until a ball of dough forms. The dough can also be made by hand.
- Shape the dough into a large ball and cut it in half. Place one half in a zip-top bag and freeze for future use.
- Roll the remaining dough between two pieces of waxed paper into a 12-inch disk. Transfer it to a pie plate and crimp the edges.
- Bake at 375°F for 10–12 minutes, or until the edges are slightly light golden brown. Let the crust cool completely.
For the Lemon Curd
- In a medium heavy saucepan, combine the gelatin, sugar, salt, egg yolks, lemon juice, and water.
- Heat over medium heat, stirring constantly, just until the mixture comes to a boil. Stir in the lemon zest and remove from the heat.
- Refrigerate for about 30–40 minutes, stirring occasionally, until the lemon mixture has started to set slightly.
For the Meringue and Assembly
- Meanwhile, beat the egg whites until stiff peaks form. For a cooked egg-white option, place the egg whites and sugar in a bowl set over a pan of boiling water. Whisk constantly for 90 seconds, then remove from the heat and beat until stiff peaks form.
- Gently fold the beaten egg whites into the chilled lemon curd mixture until combined.
- Pour the filling into the cooled pie crust. Refrigerate for at least 3 hours or overnight, until set.
- Before serving, top with whipped cream or whipped coconut topping. Garnish with lemon slices, fresh raspberries, and mint leaves if desired.
- Store the pie in the refrigerator for up to 3 days.
Notes
- Crust shortcut: A store-bought pie crust can be used to make preparation easier.
- Gluten-free option: The homemade crust uses gluten-free flour and xanthan gum. If you can have gluten, the original recipe suggests using a homemade all-purpose flour pie crust instead.
- Save the extra dough: Freeze the unused half of the crust dough in a zip-top bag for future use.
- Egg-white safety: If you are concerned about eating raw egg whites, heat the egg whites and sugar together in a bowl over boiling water, whisking constantly for 90 seconds. Then beat until stiff peaks form.
- Chilling: Refrigerate the filled pie for at least 3 hours or overnight to allow it to set properly.
- Dairy-free topping: Use non-dairy whipped topping or whipped coconut milk instead of regular whipped cream.
- Storage: Keep the pie refrigerated for up to 3 days.
- Prep Time: 20 minutes
- Cook Time: 10 minutes
- Category: Pie, Dessert
- Method: Baking, No-Bake
- Cuisine: American