
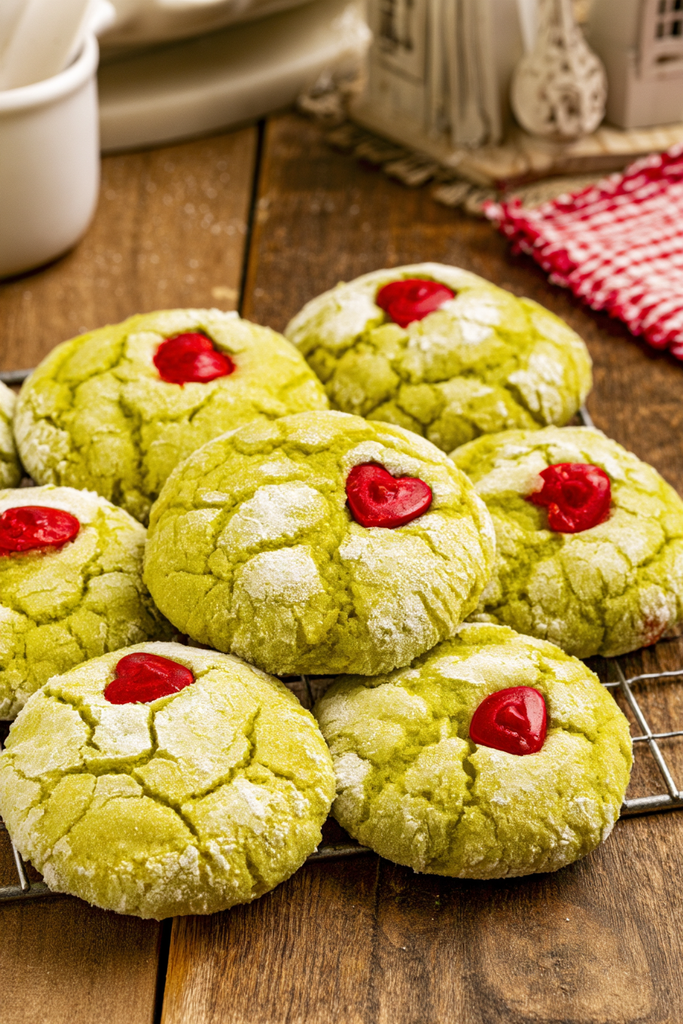
Bring a little holiday magic to your kitchen with these adorable Grinch Cookies! Inspired by the beloved Dr. Seuss Christmas character, these bright green sugar cookies feature soft, chewy centers, a sweet powdered sugar coating, and a little red candy heart that makes each one extra special.
Made with a simple sugar cookie dough, vibrant green gel food coloring, and two types of sugar for rolling, these cookies are as fun to make as they are to eat. Their crinkled powdered sugar finish and tiny red hearts give them a festive look that stands out on any Christmas dessert table.
Whether you’re baking with the kids, preparing treats for a holiday party, or putting together a Christmas cookie box, these Grinch Cookies are sure to bring smiles. They’re easy to prepare ahead of time, too, making holiday baking a little less stressful.
Why You’ll Love These Grinch Cookies
- Festive holiday colors: Bright green cookies topped with red candy hearts make a fun Christmas treat.
- Soft and chewy texture: The cookies bake up with tender centers and lightly set edges.
- Easy to make: Simple pantry ingredients come together to create a playful holiday dessert.
- A fun family baking project: Kids can help roll the dough balls in sugar and add the candy hearts.
- Make-ahead friendly: Prepare and refrigerate or freeze the dough before baking when you want to get ahead of your holiday baking.
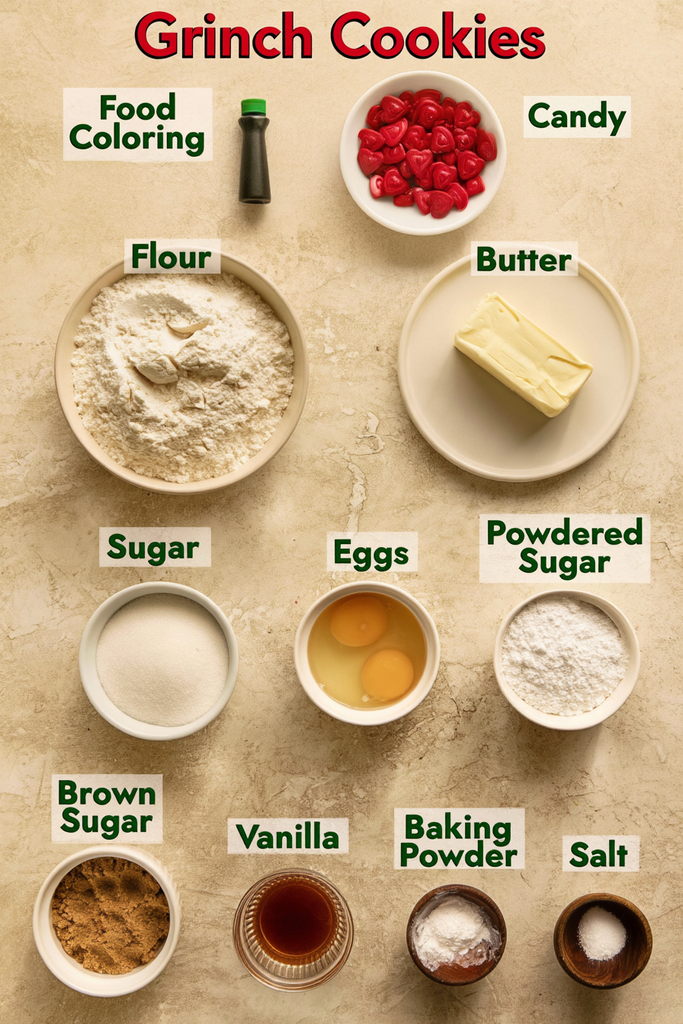
Ingredients You’ll Need
For the Cookie Dough
- All-purpose flour (2¼ cups): Provides the structure for the cookies.
- Powdered sugar (½ cup): Adds sweetness and helps create a tender cookie texture.
- Baking powder (1 teaspoon): Gives the cookies a little lift as they bake.
- Kosher salt (½ teaspoon): Balances the sweetness and enhances the flavor.
- Unsalted butter (½ cup): Use softened butter at 65–67°F (18–20°C) for the best creaming results.
- Granulated sugar (¾ cup): Sweetens the dough and helps create the cookie’s texture.
- Light brown sugar (¼ cup, packed): Adds moisture and a subtle caramel flavor.
- Large eggs (2): Bind the ingredients and help give the cookies their soft texture.
- Vanilla extract (2 teaspoons): Adds warmth and enhances the sweetness.
- Green gel food coloring: Creates the signature bright green Grinch color. The recipe uses approximately 8–10 drops.
- Heart candies or sprinkles (24): Add the little red heart that makes these cookies instantly recognizable.
For the Sugar Coating
- Granulated sugar (½ cup): Creates the first layer of coating before the powdered sugar.
- Powdered sugar (½ cup): Gives the cookies their pretty, snowy finish.
Equipment Needed
- Stand mixer or hand mixer with paddle attachment
- Medium mixing bowl
- Whisk
- Measuring cups and spoons
- Two shallow dishes for the sugar coating
- Baking sheets
- Parchment paper
- Measuring cup with a flat bottom
- Wire cooling rack
How to Make Grinch Cookies
1. Preheat the Oven
Position an oven rack in the middle of the oven and preheat to 350°F (177°C).
Line two baking sheets with parchment paper and set them aside.
2. Mix the Dry Ingredients
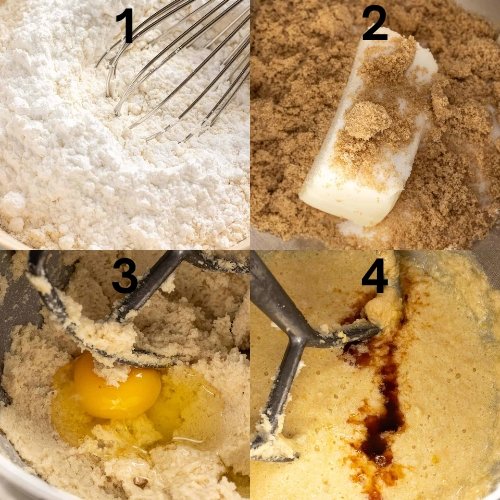
In a medium bowl, whisk together the all-purpose flour, ½ cup powdered sugar, baking powder, and kosher salt.
Set the mixture aside while you prepare the wet ingredients.
3. Cream the Butter and Sugars
Add the softened butter, ¾ cup granulated sugar, and packed brown sugar to the bowl of a stand mixer fitted with the paddle attachment.
Mix on medium speed, around setting 5, for approximately 2 minutes until the mixture looks light and fluffy. Scrape down the sides of the bowl and the paddle as needed.
4. Add the Eggs and Vanilla
Add the eggs one at a time, mixing on medium-low speed, around setting 4, for approximately 30 seconds after each addition.
Add the vanilla extract and mix for another 15 seconds until incorporated.
5. Add the Green Food Coloring
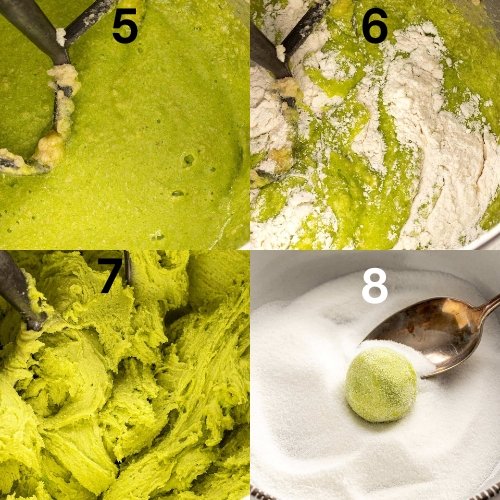
Mix in green gel food coloring until the dough reaches a bright, vibrant green color.
Approximately 8–10 drops of gel coloring are used in this recipe, but you can adjust the amount slightly to achieve your preferred shade.
6. Make the Cookie Dough
Gradually add the flour mixture to the butter mixture in four additions.
Mix on low speed until the dry ingredients are just incorporated. Avoid overmixing.
Let the dough rest for 10 minutes so it can thicken. It should have a consistency similar to modeling clay, making it easy to portion and roll.
7. Prepare the Sugar Coating
Place ½ cup granulated sugar in one shallow dish and ½ cup powdered sugar in a separate dish.
Working with approximately 1½ tablespoons (1 ounce or 30g) of dough at a time, roll each portion into a ball.
First roll the dough ball in granulated sugar, then transfer it to the powdered sugar and roll again until completely coated.
Repeat with the remaining dough.
8. Flatten the Cookies
Arrange the coated dough balls on the prepared baking sheets, spacing them at least 2 inches apart. Place approximately 12 cookies on each sheet.
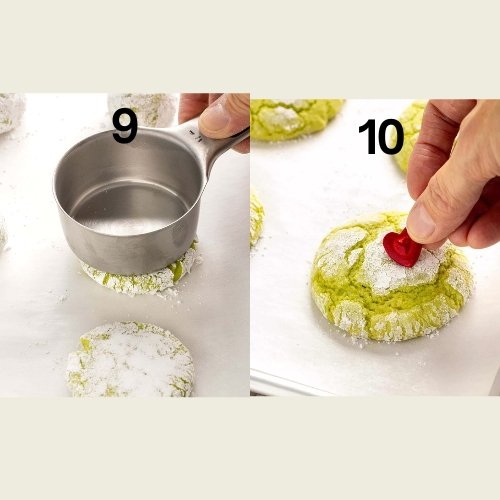
Use the flat bottom of a measuring cup to gently flatten each ball into a disc about 2 inches wide and ½ inch thick.
9. Bake the Cookies
Bake one baking sheet at a time for approximately 12–14 minutes, rotating the pan halfway through baking.
The cookies are ready when the centers look puffed and the edges are set. Avoid overbaking so the cookies stay soft and tender.
10. Add the Red Candy Hearts
Remove the cookies from the oven and immediately press one heart candy into the surface of each cookie.
For a cute Grinch-inspired look, position each heart slightly off-center toward the right.
11. Cool and Serve
Let the cookies rest on the baking sheet for 5 minutes before transferring them to a wire rack.
Allow them to cool completely before serving or storing.

Tips for Perfect Grinch Cookies
- Use properly softened butter: Butter should be around 65–67°F (18–20°C). If it’s too warm or melted, the dough may become too soft.
- Choose gel food coloring: Gel coloring provides a vibrant green shade without adding too much liquid to the dough.
- Let the dough rest: The 10-minute resting period helps the dough thicken to a manageable consistency.
- Coat in two stages: Roll the dough in granulated sugar first, followed by powdered sugar, for the signature snowy appearance.
- Flatten evenly: Aim for discs approximately 2 inches wide and ½ inch thick so the cookies bake consistently.
- Bake one sheet at a time: This helps maintain even baking and makes it easier to monitor the cookies.
- Add the hearts immediately: Press the candy hearts into the cookies as soon as they come out of the oven, while the surface is still soft.
- Don’t overbake: Remove the cookies once the centers are puffed and the edges are set to keep them tender.
Recipe Variations
Gluten-Free Grinch Cookies
To make these cookies gluten-free, replace the all-purpose flour with Bob’s Red Mill 1:1 Gluten-Free Baking Flour. Use the same amount and follow the recipe as written.
Grinch Cookies with Sprinkles
If you don’t have heart candies, use red heart-shaped sprinkles or other festive red sprinkles. They still give the cookies a cheerful holiday appearance.
Extra Bright Green Grinch Cookies
For a more vivid green color, gradually add a little more green gel food coloring until you reach the shade you want. Gel coloring works especially well because it adds strong color without significantly changing the dough’s consistency.
Mini Grinch Cookies
Make smaller dough portions for bite-sized holiday treats. Keep the cookies evenly sized and adjust the baking time as needed, checking for puffed centers and set edges.
Serving Suggestions
These colorful cookies are a lovely addition to any holiday dessert spread. Serve them with:
- Hot chocolate topped with whipped cream.
- A mug of coffee or vanilla latte.
- Christmas sugar cookies and gingerbread cookies.
- Brownies, fudge, and other festive holiday treats.
- A scoop of vanilla ice cream for an easy Christmas dessert.
They also make wonderful homemade gifts. Arrange completely cooled cookies in a festive tin or clear treat bags tied with red and green ribbon.
Frequently Asked Questions
Why are my Grinch Cookies not bright green?
The color depends on the type and amount of food coloring used. Gel food coloring is recommended because it creates a vibrant shade without adding much liquid. Start with approximately 8–10 drops and adjust as needed.
Can I use liquid food coloring instead of gel?
Gel food coloring is preferred because it provides more concentrated color. Liquid food coloring may require a larger amount to achieve the same bright green shade and can affect the dough’s consistency.
Why do I need to roll the cookies in two types of sugar?
The granulated sugar creates the first coating, while the powdered sugar gives the cookies their snowy, crinkled appearance. Rolling in both creates the festive finish that makes these cookies so recognizable.
When should I add the red candy hearts?
Add the heart candies immediately after removing the cookies from the oven. The warm cookie surface is soft enough for the hearts to press in and stay in place.
Can I make Grinch Cookie dough ahead of time?
Yes! Portion the dough and refrigerate it for up to 2 days. You can also freeze the dough for up to 1 month. Defrost before baking, then roll the dough portions in granulated sugar and powdered sugar.
How do I know when the cookies are done?
Bake for approximately 12–14 minutes, until the centers are puffed and the edges are set. The cookies should remain soft rather than becoming deeply browned.
Storage and Make-Ahead Tips
Room temperature: Once completely cooled, store the cookies in an airtight container for up to 5 days.
Refrigerating the dough: Portion the cookie dough and refrigerate it for up to 2 days. When ready to bake, roll the portions in granulated sugar and powdered sugar before baking.
Freezing the dough: The prepared dough can be frozen for up to 1 month. Defrost it before rolling the portions in the two sugars and baking.
Freezing baked cookies: Baked cookies can be frozen for up to 1 month. Store them in a freezer-safe airtight container, separating layers with parchment paper if needed.
Final Thoughts
These Grinch Cookies are a fun and festive way to bring a little extra magic to your Christmas baking. With their vibrant green color, soft centers, snowy sugar coating, and adorable red candy hearts, they’re almost too cute to eat!
Make a batch for a holiday party, bake them with the kids, or package them up as homemade Christmas gifts. They’re sure to become a favorite festive treat.
If you make these Grinch Cookies, leave a rating and review to share how they turned out. Happy holiday baking!
Print
Grinch Cookies: Soft, Chewy, and Festive Christmas Sugar Cookies
- Total Time: 55 minutes
- Yield: 24 cookies
Description
These vibrant green Grinch cookies are soft, sweet sugar cookies coated in granulated and powdered sugar, then topped with a red candy heart for a whimsical holiday treat.
Ingredients
- Dough
- 2 ¼ cups all-purpose flour
- ½ cup powdered sugar, divided
- 1 teaspoon baking powder
- ½ teaspoon kosher salt
- ½ cup unsalted butter, softened to 65 to 67ºF (18 to 20ºC)
- ¾ cup granulated sugar, divided
- ¼ cup packed light brown sugar
- 2 large eggs
- 2 teaspoons vanilla extract
- Green gel food coloring
- 24 heart candies or sprinkles
- Coating
- ½ cup granulated sugar
- ½ cup powdered sugar
Instructions
- Preheat the Oven: Set the oven rack to the middle position. Preheat the oven to 350ºF (177ºC). Line two baking sheets with parchment paper.
- Mix the Dry Ingredients: In a medium bowl, whisk together the flour, ½ cup powdered sugar, baking powder, and salt.
- Cream the Butter and Sugar: In a stand mixer or with a hand mixer fitted with the paddle attachment, beat the butter, ¾ cup granulated sugar, and brown sugar on medium speed until light and fluffy, about 2 minutes. Scrape down the bowl and paddle.
- Add the Eggs: Add the eggs one at a time, mixing on medium-low speed for about 30 seconds after each addition. Mix in the vanilla for 15 seconds.
- Add the Color: Mix in enough green gel food coloring to achieve a bright green color, about 8 to 10 drops.
- Make the Dough: Gradually add the flour mixture in four additions, mixing on low speed just until combined. Let the dough sit for 10 minutes to thicken. It should feel like modeling clay.
- Coat and Roll the Dough: Place ½ cup granulated sugar in one shallow dish and ½ cup powdered sugar in another. Portion the dough into 1½-tablespoon (1-ounce or 30-gram) portions and roll into balls. Roll each ball in granulated sugar, then coat in powdered sugar.
- Flatten the Dough: Arrange the dough balls on the prepared baking sheets, spacing them at least 2 inches apart, with about 12 cookies per sheet. Use the bottom of a measuring cup to flatten each ball into a 2-inch-wide disc about ½ inch thick.
- Bake: Bake one sheet at a time for 12 to 14 minutes, until the centers are puffed and the edges are set. Rotate the pan halfway through baking.
- Add the Hearts: Remove the cookies from the oven and immediately press one heart candy into each cookie, placing it slightly off-center if desired.
- Cool: Let the cookies rest on the baking sheet for 5 minutes, then transfer them to a wire rack. Cool completely before serving.
Notes
- Make it Gluten-Free: Replace the all-purpose flour with Bob’s Red Mill 1:1 Gluten-Free Baking Flour.
- Make Ahead: Portion the cookie dough and refrigerate for up to 2 days. Freeze for up to 1 month and defrost before baking. Roll in the granulated and powdered sugar coatings just before baking.
- Storing: Store cookies in an airtight container for up to 5 days or freeze for up to 1 month.
- Prep Time: 30 minutes
- Cook Time: 25 minutes
- Category: Dessert
- Method: Bake
- Cuisine: American