
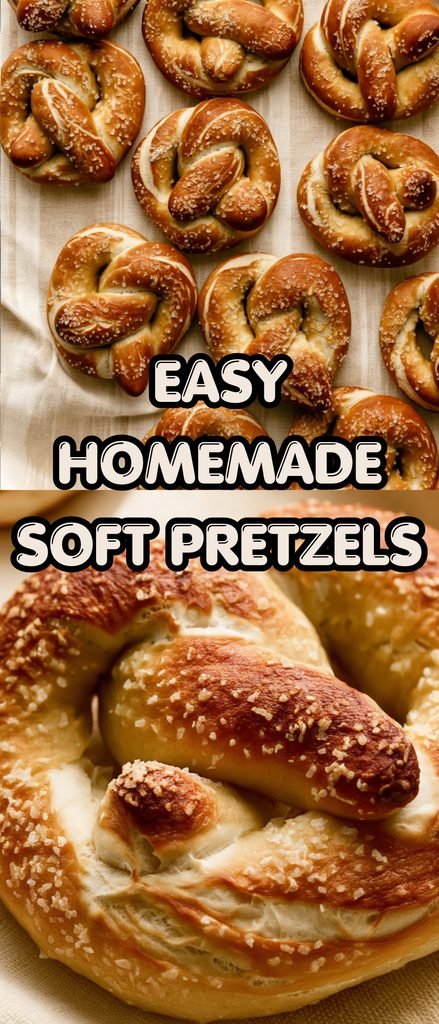
There’s something special about biting into a freshly baked soft pretzel. With a beautifully golden-brown exterior, a soft and chewy center, and a sprinkle of coarse salt on top, these Easy Homemade Soft Pretzels are just as delicious as the ones you find at your favorite bakery. Even better, you can make them right in your own kitchen with simple ingredients!
Whether you’re preparing a fun weekend snack, looking for something to serve at a family gathering, or craving a warm homemade treat, this soft pretzel recipe is sure to satisfy. The dough is beginner-friendly, requires only a short resting time, and doesn’t involve complicated techniques.
The secret to their classic pretzel flavor and chewy texture is a quick baking soda bath before baking. Once you try these homemade soft pretzels, you may never want store-bought ones again!
Why You’ll Love This Recipe
- Easy for Beginners: Simple ingredients and straightforward instructions make this recipe perfect for anyone learning to bake with yeast.
- Quick Preparation: The dough only needs to rest for 10–30 minutes before shaping, so you can enjoy homemade pretzels without a long wait.
- Soft and Chewy Texture: A quick baking soda bath creates the traditional pretzel flavor and wonderfully chewy exterior.
- Perfect for Sharing: This recipe makes 12 pretzels, making it ideal for parties, family snacks, game days, or casual gatherings.
- Customizable Flavors: Enjoy them with coarse salt, cinnamon sugar, or your favorite dipping sauce.
Ingredients for Easy Homemade Soft Pretzels
You only need a handful of everyday ingredients to make these delicious homemade soft pretzels.
- Instant or Active Dry Yeast (2 1/4 teaspoons): Helps the dough rise and gives the pretzels their soft, fluffy interior.
- Brown Sugar or Granulated Sugar (1 tablespoon): Adds a touch of sweetness and helps activate the yeast.
- Warm Water (1 1/2 cups): Provides moisture and helps the yeast dissolve. Aim for approximately 100°F (38°C).
- Unsalted Butter (1 tablespoon, melted): Adds richness and flavor while helping create a tender dough.
- Salt (1 teaspoon): Enhances the flavor of the dough and balances the sweetness.
- All-Purpose Flour (3 3/4–4 cups): Forms the structure of the pretzels and creates their soft, chewy texture.
- Coarse Salt: Sprinkled over the pretzels before baking for that classic bakery-style finish.
For the Baking Soda Bath
- Baking Soda (1/2 cup): Creates the traditional pretzel flavor, helps develop a deep golden-brown crust, and contributes to the chewy exterior.
- Water (9 cups): Used to dissolve the baking soda and prepare the pretzel bath.
How to Make Easy Homemade Soft Pretzels
Making homemade soft pretzels is easier than you might think! Follow these simple steps to prepare perfectly shaped, golden-brown pretzels with a soft and chewy center.
Step 1: Activate the Yeast
In a large mixing bowl, whisk together the yeast, sugar, and warm water. Cover the bowl and let the mixture sit for about 1 minute.
The water should feel warm but not hot. Water that’s too hot can damage the yeast and prevent the dough from rising properly.
Step 2: Make the Pretzel Dough
Whisk the melted butter and salt into the yeast mixture.
Add 3 cups of flour and mix with a wooden spoon or the dough hook attachment of a stand mixer until combined.
Add another 3/4 cup of flour and continue mixing until the dough starts pulling away from the sides of the bowl. If the dough is still very sticky, gradually add up to 1/4 cup more flour, one tablespoon at a time.
The dough should feel soft and slightly tacky without sticking excessively to your fingers.
Step 3: Knead the Dough
Keep the dough in the stand mixer and knead with the dough hook for 3–5 minutes. Alternatively, transfer it to a lightly floured surface and knead by hand for the same amount of time.
If the dough becomes too sticky while kneading, sprinkle a little flour over it, adding only what you need.
To check whether the dough is ready, gently poke it with your finger. It should slowly bounce back. You can also stretch a small piece of dough until it’s thin enough for light to pass through without tearing. This is called the windowpane test.
Step 4: Let the Dough Rest
Shape the kneaded dough into a ball and place it in a lightly covered bowl.
Let it rest for 10–30 minutes. This short resting period allows the dough to relax, making it easier to roll and shape.
While the dough rests, prepare the baking soda bath so it’s ready when you finish shaping the pretzels.
Step 5: Prepare the Oven and Baking Sheets
Preheat your oven to 400°F (204°C).
Line two baking sheets with silicone baking mats or parchment paper. Silicone baking mats are recommended because they help prevent sticking.
If using parchment paper, lightly grease it with nonstick cooking spray or butter.
Step 6: Divide and Shape the Pretzels
Transfer the rested dough to a clean work surface.
Using a sharp knife or pizza cutter, divide the dough into 12 equal portions, approximately 75 grams each.
Take one portion and roll it into a long rope about 20–22 inches in length.
Shape the rope into a large circle, bringing both ends together at the top. Twist the ends together, then fold them downward toward yourself and press them gently onto the bottom of the circle to form the classic pretzel shape.
Repeat with the remaining dough portions.
Step 7: Prepare the Baking Soda Bath
In a large pot, bring 9 cups of water and 1/2 cup of baking soda to a boil.
Carefully lower 1–2 shaped pretzels into the boiling water at a time. Let them soak for 20–30 seconds.
This step is important because it gives homemade pretzels their distinctive flavor, chewy texture, and beautiful golden-brown crust.
Avoid leaving them in the water for longer than 30 seconds, as this can create an unpleasant metallic taste.
Use a slotted spatula to remove each pretzel, allowing excess water to drain before transferring it to the prepared baking sheets.
Step 8: Add the Salt and Bake
Sprinkle the tops of the boiled pretzels with coarse salt.
Place the baking sheets in the preheated oven and bake for 12–15 minutes, or until the pretzels are a deep golden brown.
Keep an eye on them toward the end of baking, as oven temperatures can vary.
Step 9: Cool and Serve
Remove the pretzels from the oven and allow them to cool slightly.
Serve them warm with your favorite dipping sauce, such as spicy nacho cheese sauce, mustard, or a creamy cheese dip.
Enjoy the soft, chewy centers and delicious golden crust!
Tips for Success
A few simple tricks will help you get bakery-style results every time you make these Easy Homemade Soft Pretzels.
- Check the Water Temperature: Use warm water around 100°F (38°C). Water that’s too hot can kill the yeast.
- Don’t Add Too Much Flour: The dough should remain soft and slightly tacky. Adding too much flour can make the pretzels dry and dense.
- Knead Properly: Kneading develops the gluten that gives pretzels their chewy texture. Don’t skip this important step.
- Don’t Skip the Baking Soda Bath: This step is strongly recommended for achieving the traditional pretzel taste, texture, and color.
- Keep the Boiling Time Short: Boil each pretzel for only 20–30 seconds to prevent an unpleasant metallic flavor.
- Shape Evenly: Try to make all 12 pretzels similar in size so they bake at the same rate.
- Use Silicone Baking Mats: They are especially helpful for preventing the pretzels from sticking to the baking sheets.
- Serve Fresh: Homemade soft pretzels taste best when they’re warm and freshly baked.
Equipment Needed
You don’t need professional baking equipment to make delicious homemade pretzels. These basic kitchen tools will make the process easier:
- Large Mixing Bowl: For combining the yeast and preparing the dough.
- Stand Mixer with Dough Hook (Optional): Makes kneading easier, but you can knead the dough by hand.
- Wooden Spoon: Helps mix the ingredients when preparing the dough.
- Measuring Cups and Spoons: For accurate ingredient measurements.
- Kitchen Scale (Optional): Helps divide the dough into 12 equal portions.
- Sharp Knife or Pizza Cutter: For cutting the dough into individual portions.
- Large Pot or Dutch Oven: For preparing the baking soda bath.
- Slotted Spatula: Makes it easier to remove pretzels from the boiling water.
- Two Baking Sheets: Provide enough space to bake all 12 pretzels.
- Silicone Baking Mats or Parchment Paper: Prevent the pretzels from sticking.
- Cooling Rack: Allows the pretzels to cool evenly after baking.
Recipe Variations
One of the best things about this easy homemade soft pretzel recipe is how versatile it is. Try these variations to create something different every time.
1. Cinnamon Sugar Pretzels
For a sweet twist, skip the coarse salt topping and bake the pretzels as directed.
While they’re still warm, brush them generously with 4 tablespoons of melted butter.
Combine 3/4 cup granulated sugar with 1 1/2 teaspoons ground cinnamon. Dip the buttered pretzels into the cinnamon-sugar mixture until coated.
These sweet pretzels are perfect for breakfast, dessert, or an afternoon snack. They’re best enjoyed the day they’re made.
2. Cheesy Soft Pretzels
Add a cheesy twist by serving your freshly baked pretzels with warm cheese sauce.
You can also sprinkle shredded cheddar cheese over the pretzels before baking for an extra cheesy finish. Watch them carefully to prevent the cheese from browning too much.
3. Garlic Butter Pretzels
For a savory variation, brush the freshly baked pretzels with melted butter mixed with minced garlic and a little chopped parsley.
Finish with a sprinkle of Parmesan cheese for an irresistible garlic bread-inspired flavor.
4. Everything Bagel Pretzels
Replace the coarse salt topping with everything bagel seasoning before baking.
The combination of sesame seeds, poppy seeds, dried garlic, dried onion, and salt adds plenty of savory flavor and a delicious crunch.
5. Spicy Pretzels
If you enjoy a little heat, sprinkle the pretzels with crushed red pepper flakes or cayenne pepper before baking.
Serve with spicy nacho cheese sauce or a creamy jalapeño dip for an extra flavorful snack.
Serving Suggestions
These Easy Homemade Soft Pretzels are delicious on their own, but pairing them with the right dips and sides makes them even better.
Here are some tasty serving ideas:
- Spicy Nacho Cheese Sauce: A warm, creamy cheese dip that complements the salty pretzel crust.
- Classic Yellow Mustard: Adds a tangy flavor that balances the buttery dough.
- Honey Mustard: A sweet and tangy option that works especially well with soft pretzels.
- Cream Cheese Dip: A smooth, creamy dip for a delicious snack.
- Beer Cheese Dip: A rich, savory accompaniment for parties and game-day gatherings.
- Marinara Sauce: Perfect for anyone who enjoys a pizza-inspired snack.
- Garlic Butter: Brush over warm pretzels for extra buttery, savory flavor.
For a party or family gathering, arrange the pretzels on a large serving platter with several small bowls of dipping sauces. It’s an easy, crowd-pleasing snack everyone can enjoy!
Frequently Asked Questions
1. Can I make homemade soft pretzels without a stand mixer?
Absolutely! You can make the dough entirely by hand. Mix the ingredients with a wooden spoon until a dough forms, then transfer it to a lightly floured surface and knead for 3–5 minutes until smooth and elastic.
A stand mixer makes the process easier, but it isn’t necessary.
2. Why do homemade pretzels need a baking soda bath?
The baking soda bath gives pretzels their traditional flavor, chewy exterior, and deep golden-brown color.
It changes the surface of the dough, helping it develop the distinctive crust associated with classic soft pretzels. For the best results, don’t skip this step.
3. Can I prepare pretzel dough ahead of time?
Yes! You can cover the prepared dough and refrigerate it for up to 1 day.
When ready to use it, shape the dough while it’s still cold. Allow the shaped pretzels to rest at room temperature for about 1 hour so they can puff up before continuing with the baking soda bath and baking.
You can also freeze the dough for 2–3 months. Thaw it overnight in the refrigerator before using.
4. How should I store leftover soft pretzels?
Allow the pretzels to cool completely, then store them in an airtight container at room temperature for up to 3 days.
To reheat, microwave them for a few seconds or place them in a 350°F (177°C) oven for about 5 minutes until warm.
5. Can I freeze homemade soft pretzels?
Yes! You can freeze fully baked pretzels for up to 3 months.
For best results, freeze them without the coarse salt topping. Once completely cooled, place them in an airtight freezer-safe container or zip-top bag.
When ready to enjoy, brush the frozen pretzels with a little water, sprinkle with coarse salt, and bake at 350°F (177°C) for approximately 20 minutes or until heated through.
You can also microwave them from frozen until warm.
6. Can I freeze pretzels before baking?
Yes! After completing the baking soda bath, arrange the pretzels on a lightly greased, lined baking sheet and freeze for about 1 hour.
Transfer the frozen pretzels to an airtight freezer-safe container or zip-top bag and freeze for up to 3 months.
When ready to bake, brush them with water, add coarse salt, and bake directly from frozen at 400°F (204°C) for 15–20 minutes, or until deep golden brown.
Conclusion: Enjoy Freshly Baked Homemade Soft Pretzels!
These Easy Homemade Soft Pretzels are proof that you don’t need a bakery to enjoy delicious, soft, chewy pretzels at home. With simple ingredients, an easy-to-follow method, and a quick baking soda bath, you can make a batch of golden-brown treats that everyone will love.
Enjoy them warm with cheese sauce, mustard, or your favorite dip, or try the cinnamon-sugar version when you’re craving something sweet.
Whether you’re making them for a weekend snack, a family movie night, or your next gathering, these homemade soft pretzels are always a delicious idea.
Give this easy soft pretzel recipe a try, and don’t forget to share your experience! Let us know whether you prefer classic salted pretzels or sweet cinnamon-sugar pretzels.
Print
Easy Homemade Soft Pretzels: Soft, Chewy, and Golden Brown
- Total Time: 40 minutes
- Yield: 12 pretzels
Description
These easy homemade soft pretzels are beginner-friendly, with a soft, chewy texture and classic pretzel flavor. The simple yeast dough rests for just 10–30 minutes before shaping, and a quick baking soda bath gives the pretzels their traditional taste and golden-brown finish.
Ingredients
- 2 1/4 teaspoons (7g) instant or active dry yeast (1 standard packet)
- 1 tablespoon brown sugar or granulated sugar
- 1 1/2 cups (360ml) warm water (around 100°F/38°C)
- 1 tablespoon (14g) unsalted butter, melted and slightly cooled
- 1 teaspoon salt
- 3 3/4–4 cups (469–500g) all-purpose flour, spooned and leveled, plus more as needed
- Coarse salt, for topping
Baking Soda Bath
- 1/2 cup (120g) baking soda
- 9 cups (2.13L) water
Instructions
- Whisk the yeast and sugar into the warm water. Cover and let sit for 1 minute.
- Whisk in the melted butter and salt. Add 3 cups (375g) of flour and mix with a wooden spoon or dough hook until combined. Add another 3/4 cup (94g) flour until the dough is slightly tacky and pulls away from the sides of the bowl. If it is still sticky, add up to 1/4 cup (31g) more flour, 1 tablespoon at a time, as needed. Poke the dough with your finger; if it bounces back, it is ready to knead.
- Knead the dough: Knead in a stand mixer for 3–5 minutes, or knead by hand on a lightly floured surface for 3–5 minutes. If the dough becomes too sticky, sprinkle 1 teaspoon of flour at a time onto the dough or work surface. Add only as much flour as needed to keep the dough soft and slightly tacky. After kneading, the dough should feel soft and slowly bounce back when poked. You can also test it by stretching a small piece thin enough for light to pass through without tearing.
- Shape the dough into a ball. Cover lightly with a towel and let rest for 10–30 minutes. Meanwhile, bring the water and baking soda for the bath to a boil in a large pot.
- Preheat the oven to 400°F (204°C). Line 2 baking sheets with parchment paper or silicone baking mats. Silicone mats are recommended. If using parchment paper, lightly spray it with nonstick spray or grease with butter.
- Use a sharp knife or pizza cutter to divide the dough into 75g portions, about 1/3 cup of dough each.
- Roll each piece into a 20–22-inch rope. Form a circle, bring the two ends together at the top, and twist them together. Bring the twisted ends down toward yourself and press them onto the bottom of the circle to create a pretzel shape.
- Carefully drop 1–2 pretzels into the boiling baking soda water for 20–30 seconds. Do not boil longer, or the pretzels may develop a metallic taste. Lift each pretzel out with a slotted spatula, allowing excess water to drip off, and place it on the prepared baking sheet. Repeat with the remaining pretzels. If desired, cover the boiled, unbaked pretzels with lightly oiled plastic wrap and refrigerate for up to 24 hours before baking.
- Sprinkle the pretzels with coarse salt. Bake for 12–15 minutes, or until dark golden brown.
- Remove from the oven and serve warm, optionally with cheese sauce.
- Cover and store leftover pretzels at room temperature for up to 3 days. To reheat, microwave for a few seconds or bake at 350°F (177°C) for 5 minutes.
Notes
- Make ahead and freeze baked pretzels: For freezing fully baked pretzels, leave off the coarse salt before baking. Cool completely, then freeze in an airtight freezer-safe container or zip-top bag for up to 3 months. To reheat, brush frozen pretzels with water, sprinkle with coarse salt, and bake at 350°F (177°C) for about 20 minutes or until warmed through. You can also microwave them until warm.
- Make ahead and freeze dough: Cover and refrigerate prepared dough for up to 1 day, or freeze in an airtight container for 2–3 months. Thaw frozen dough overnight in the refrigerator. Shape refrigerated dough while cold, then allow the shaped pretzels about 1 hour at room temperature to puff up before continuing with the baking soda bath and baking.
- Freeze boiled, unbaked pretzels: After the baking soda bath, place pretzels on a lightly greased, parchment-lined or silicone-mat-lined baking sheet. Freeze for about 1 hour, then transfer to an airtight freezer-safe container or zip-top bag and freeze for up to 3 months. To bake, brush frozen pretzels with water, sprinkle with coarse salt, and bake at 400°F (204°C) for 15–20 minutes, or until dark golden brown.
- Baking soda bath: The baking soda bath is strongly recommended for the traditional chewy texture and pretzel flavor. If skipping it, brush the shaped, unbaked pretzels with an egg wash made from 1 beaten egg and 1 tablespoon of dairy or nondairy milk. Sprinkle with salt. Alternatively, brush with 2 tablespoons of dairy or nondairy milk.
- Cinnamon sugar pretzels: Skip the coarse salt topping and, if not using the baking soda bath, skip the egg wash. Bake as directed. Meanwhile, melt 4 tablespoons (56g) unsalted or salted butter. Brush the warm baked pretzels with melted butter, then dip the tops into a mixture of 3/4 cup (150g) granulated sugar and 1 1/2 teaspoons cinnamon. These are best eaten the day they are made, as the butter topping can make them soggy after a few hours.
- Prep Time: 25 minutes
- Cook Time: 15 minutes
- Category: Bread, Snack
- Method: Baking
- Cuisine: American