
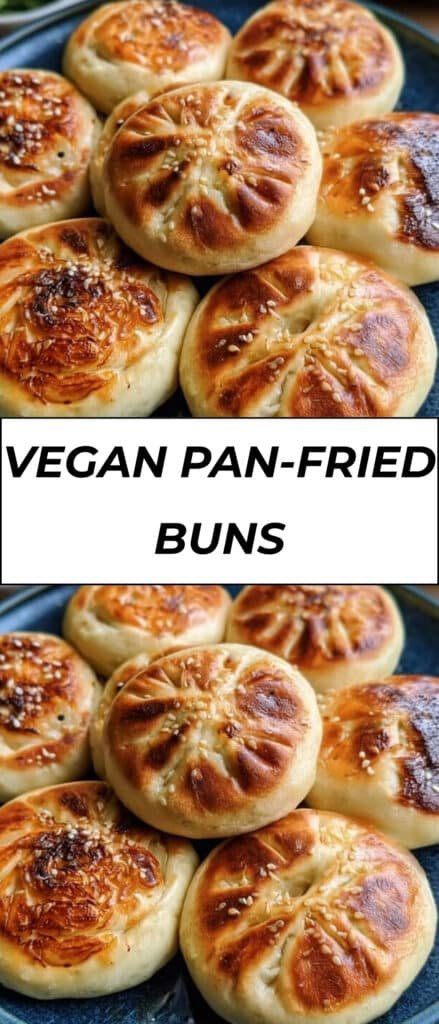
These Vegan Pan-Fried Buns, also known as Sheng Jian Bao, are the kind of homemade treat that makes an ordinary meal feel extra special. Each bun is packed with a savory mixture of tender cabbage, vermicelli noodles, carrots, and scallions, then wrapped in soft homemade dough and pan-fried until beautifully golden and crisp.
What makes these Chinese-inspired buns so irresistible is the contrast in texture. The bottoms develop a deliciously crisp, golden crust, while the tops stay soft and chewy from the steam. The vegetable filling is savory, aromatic, and lightly nutty from toasted sesame oil and sesame seeds.
Inspired by the popular pan-fried buns found at food stalls and night markets in Taipei, this vegan Sheng Jian Bao recipe is perfect for snacks, appetizers, lunch, or a fun homemade dinner. They also freeze wonderfully, so you can make a big batch and enjoy them whenever a craving strikes.
Why You’ll Love This Recipe
- Crispy and chewy: Golden pan-fried bottoms meet soft, steamed dough for an irresistible texture.
- Completely vegan: The filling and dough are made without animal products.
- Flavor-packed filling: Cabbage, carrots, vermicelli, scallions, soy sauce, and sesame oil create a delicious savory combination.
- Freezer-friendly: Make a large batch and freeze the cooked buns for convenient meals later.
- Perfect for sharing: These bite-sized buns are ideal for appetizers, snacks, parties, or family-style meals.
Ingredients
For the Dough
- All-purpose flour: Forms the soft, sturdy dough that surrounds the flavorful filling.
- Instant dry yeast: Helps the dough rise and gives the buns their soft, pleasantly chewy texture.
- Sugar: Adds a subtle sweetness and supports the yeast.
- Salt: Balances the flavors in the dough.
- Roasted sesame seeds: Add a subtle nutty flavor and extra texture.
- Warm soy milk: Provides the liquid needed to bring the dough together while keeping it completely vegan. Another non-dairy milk can also be used.
- Toasted sesame oil: Adds a fragrant, nutty note to the dough.
For the Vegetable Filling
- Neutral oil: Used to sauté the vegetables without overpowering their flavors.
- Shredded cabbage: Provides the bulk of the filling along with a tender texture and mild sweetness.
- Vermicelli noodles: Add body and a pleasant chewy texture to the filling.
- Carrot: Brings natural sweetness, color, and a little crunch.
- Scallions or chives: Add a fresh, aromatic flavor.
- Soy sauce: Provides savory umami and seasons the filling.
- Salt: Enhances all of the other ingredients.
- Roasted sesame seeds: Add nuttiness and texture.
- Toasted sesame oil: Gives the filling its signature fragrant sesame flavor.
How to Make Vegan Pan-Fried Buns
1. Prepare the Dough
Start by combining the flour, instant yeast, sugar, salt, and roasted sesame seeds in a large mixing bowl.
Make a well in the center and gradually add the warm soy milk and toasted sesame oil while mixing. Continue mixing until everything comes together into a dough.
Transfer the dough to a lightly floured surface if needed and shape it into a smooth ball. Place it in a bowl, cover it with a damp towel, and allow it to rest and rise for about 2 hours.
Tip: The soy milk should be warm rather than hot. Very hot liquid can interfere with the yeast.
2. Prepare the Vermicelli
Place the dry vermicelli noodles in boiling water and let them soak for about 7–8 minutes, or until tender.
Drain them thoroughly and allow them to cool slightly. Cut the noodles into small pieces, roughly ½ inch long.
Cutting the noodles makes the filling much easier to scoop into the wrappers and prevents long strands from making the buns difficult to seal.
3. Cook the Vegetable Filling
Heat 1 tablespoon of neutral oil in a large skillet over medium-high heat.
Add the chopped scallions or chives, shredded carrots, and cabbage. Cook for about 4–5 minutes, stirring occasionally, until the vegetables become tender.
Add the chopped vermicelli noodles, soy sauce, salt, and toasted sesame oil. Stir everything together and cook for another 2–3 minutes.
Taste the filling and adjust the seasoning if necessary.
Transfer the cooked filling to a strainer and allow any excess liquid to drain away. Let the filling cool completely before assembling the buns.
Important: Cooling and draining the filling helps prevent the wrappers from becoming soggy or difficult to seal.
4. Divide and Shape the Dough
Once the dough has risen, transfer it to your work surface.
Make a hole in the center and gently stretch the dough into a large ring. Divide the dough into 16 pieces for smaller buns, or 12 pieces for larger buns.
For 16 buns, each piece will weigh approximately 38 grams. For 12 buns, each piece will be around 50 grams.
Roll each portion into a smooth ball.
5. Roll the Wrappers
Lightly flatten one dough ball and dust it with a little flour.
Using a rolling pin, roll the dough forward and backward while rotating it 90 degrees occasionally. Continue until you have a round wrapper about 3–4 inches wide for the smaller buns.
For larger buns, aim for approximately 4–5 inches in diameter.
The wrappers don’t need to be perfectly round. A little unevenness is completely fine, especially when you’re learning how to make homemade buns.
Place the finished wrappers on a lightly floured tray. If stacking them, dust between each wrapper with flour and keep the stacks relatively short. Cover them with a dry towel so they don’t dry out.
6. Fill and Shape the Buns
Place one wrapper in your hand and add approximately 2–3 tablespoons of the cooled vegetable filling to the center.
Begin gathering the edges of the wrapper around the filling, creating small folds as you work your way around.
Once all the edges have been gathered, pinch and twist the top to seal the bun securely.
Place the finished bun on a flat surface and gently press down on the top.
Cover the finished buns with a towel while you work on the remaining wrappers. This prevents the dough from drying out.
Tip: Don’t overfill the buns. Too much filling can make the wrapper difficult to close and may cause it to split during cooking.
7. Pan-Fry the Buns
Heat a large skillet with a lid over medium heat. Add about 1 tablespoon of oil for every 4 buns you plan to cook.
When the oil is hot, carefully place the buns into the skillet, with the sealed side facing down first. Gently press them down slightly.
Cook for about 4–5 minutes, or until the bottoms develop a deep golden-brown crust.
Carefully turn the buns and cook the other side until golden.
8. Steam the Buns
Using the skillet lid as protection from splashing oil, carefully add about 4 tablespoons of water to the pan, approximately 1 tablespoon per bun.
Immediately cover the skillet with the lid.
Allow the buns to steam for about 5–6 minutes, or until the water has evaporated and the dough is cooked through.
Remove the lid carefully, transfer the buns to a serving plate, and repeat the process with the remaining buns.
Serve hot with your favorite dipping sauce.
Tips for Success
- Keep the filling relatively dry: Excess moisture can make the wrappers soggy and difficult to seal.
- Let the filling cool: Warm filling can soften the dough and make shaping more difficult.
- Don’t overfill: A modest amount of filling makes the buns much easier to close.
- Keep unused dough covered: Exposure to air can cause the dough to form a dry skin.
- Don’t overcrowd the skillet: Give the buns enough room to cook evenly and develop a crisp crust.
- Use medium heat: Excessively high heat can burn the bottoms before the dough is fully cooked.
- Add water carefully: The hot oil can splatter when water is added, so use the skillet lid as a shield and cover the pan immediately.
- Serve them hot: Sheng Jian Bao are at their best when the bottoms are crisp and the centers are warm.
Equipment Needed
- Large mixing bowl
- Large skillet or frying pan with a lid
- Rolling pin
- Wooden spoon or spatula
- Kitchen scale, optional
- Knife or kitchen scissors
- Colander or fine-mesh strainer
- Large tray for the wrappers and assembled buns
- Clean kitchen towels
A wide nonstick skillet works particularly well, but a well-seasoned cast-iron or stainless-steel skillet can also be used.
Recipe Variations
Spicy Vegan Pan-Fried Buns
Add chili crisp, chili oil, or finely chopped fresh chilies to the vegetable filling. You can also serve the finished buns with extra chili sauce for a spicy kick.
Mushroom and Cabbage Buns
Add finely chopped shiitake, cremini, or oyster mushrooms to the filling. Sauté the mushrooms with the cabbage and carrots for an extra savory, umami-rich version.
Tofu Vegetable Buns
For a heartier filling, crumble firm tofu and sauté it with the cabbage, carrots, and scallions. Season with soy sauce and sesame oil for an extra protein-rich variation.
Extra-Garlicky Buns
Add finely minced garlic or garlic chives to the filling for a stronger aromatic flavor.
Serving Suggestions
These vegan pan-fried buns make a fantastic snack or appetizer, but they can also become a satisfying meal when served with a few simple sides.
Serve them with a dipping sauce made from soy sauce, a little sugar, chili sauce, and toasted sesame seeds.
For a complete meal, pair the buns with:
- Cucumber salad
- Asian-inspired cabbage slaw
- Steamed or stir-fried vegetables
- Edamame
- Simple vegetable soup
- Pickled vegetables
- Extra chili crisp or chili oil
For serving, arrange the buns on a platter with the crispy bottoms facing upward so everyone can see that beautiful golden crust.
How to Store Vegan Pan-Fried Buns
Allow cooked buns to cool before transferring them to an airtight container.
Store them in the refrigerator for up to 5 days.
To reheat, pan-fry them again with a small splash of water, warm them gently in the oven or toaster oven, or microwave them with a little water to help restore moisture.
Can You Freeze Sheng Jian Bao?
Yes! These vegan pan-fried buns are excellent for freezing.
Place the cooked buns on a tray in a single layer, leaving space between them so they don’t stick together. Freeze for approximately 5–6 hours, or until completely firm.
Once frozen, transfer the buns to a freezer-safe silicone or plastic bag.
You can reheat the buns directly from frozen, so there is no need to thaw them first. Pan-frying, steaming, or reheating in a toaster oven are all convenient options.
FAQs
What are Sheng Jian Bao?
Sheng Jian Bao are Chinese-style pan-fried buns traditionally associated with Shanghai cuisine. They have a soft, chewy dough and a crispy, golden pan-fried bottom. This vegan version uses a flavorful vegetable and vermicelli filling.
Can I make these buns ahead of time?
Yes. You can prepare the filling and dough ahead of time, or cook the entire batch and refrigerate the finished buns for up to 5 days. They can also be frozen for longer storage.
Can I use a different non-dairy milk?
Absolutely. Soy milk works well, but another unsweetened non-dairy milk can be substituted. Choose one with a relatively neutral flavor.
Why are my buns sticking to the pan?
The skillet may not have been adequately oiled or the buns may have been left undisturbed for too long after the oil became hot. Make sure the pan is properly heated and lightly coated with oil before adding the buns.
How do I prevent the buns from becoming soggy?
The most important step is draining excess liquid from the cooked vegetable filling. Also, allow the filling to cool before placing it inside the wrappers.
Can I make the buns spicy?
Definitely. Add chili oil, chili crisp, fresh chopped chilies, or your favorite hot sauce to the filling or dipping sauce. You can easily adjust the spice level to your preference.
Final Thoughts
These Vegan Pan-Fried Buns are a delicious project for anyone who loves homemade Asian-inspired food. From the soft, homemade wrappers to the savory cabbage and noodle filling and that irresistible golden crust, every bite offers a wonderful combination of textures and flavors.
They do take a little time and practice, especially when you’re learning to roll and pleat the wrappers, but the results are well worth the effort. Once you get the hang of shaping the buns, making a larger batch becomes much easier.
Whether you’re preparing them for a cozy family meal, a weekend cooking project, or simply stocking your freezer with something delicious, these homemade Sheng Jian Bao are sure to disappear quickly.
Serve them hot with a flavorful dipping sauce, grab one while the bottoms are still crispy, and enjoy a taste of Taiwanese-inspired street-food comfort right from your own kitchen. If you try this vegan pan-fried buns recipe, share how they turned out and let others know what filling variations you enjoyed!
Print
Vegan Pan-Fried Buns
- Total Time: 2 hours 30 minutes
- Yield: 16 buns
- Diet: Vegan
Description
These vegan pan-fried buns, also known as Sheng Jian Bao, are filled with cabbage, vermicelli noodles, carrots, and scallions, wrapped in homemade dough, then pan-fried until golden and crisp before being steamed until tender and chewy. Inspired by the popular buns found at food stalls and night markets in Taipei, these flavorful buns are perfect as an appetizer, snack, or side dish and can also be frozen for later.
Ingredients
- 3 cups all-purpose flour (375 g)
- 2 tsp instant dry yeast
- 2 tbsp sugar
- 1/2 tsp salt
- 1 tbsp roasted sesame seeds
- 1 cup warm soy milk or other non-dairy milk
- 1 tbsp toasted sesame oil or neutral oil
- 1 tbsp neutral oil for cooking
- 6 cups raw shredded cabbage
- 3.5 oz uncooked vermicelli noodles (100 g)
- 1 cup finely shredded or grated carrot (150 g)
- 1/2 cup chopped scallions or chives (25 g)
- 1 tbsp soy sauce
- 2 tsp salt, or to taste
- 1 tbsp roasted sesame seeds
- 2 tbsp toasted sesame oil
Instructions
- In a large bowl, mix together the flour, instant yeast, sugar, salt, and roasted sesame seeds. Create a well in the center, then pour in the warm soy milk and sesame oil while mixing until a dough forms.
- Shape the dough into a ball and place it in a bowl. Cover with a damp towel and let it rest for at least 2 hours, until the dough has risen.
- Soak the vermicelli noodles in boiling water for 7–8 minutes, or until cooked. Drain well and roughly chop into small pieces.
- Heat 1 tbsp neutral oil in a pan. Add the scallions or chives, carrots, and cabbage. Cook over medium-high heat for 4–5 minutes, until the carrots are tender.
- Add the chopped vermicelli noodles, soy sauce, salt, and toasted sesame oil. Mix well and cook for another 2–3 minutes. Adjust seasoning to taste.
- Transfer the filling to a strainer to drain excess liquid, then set aside to cool.
- Take the dough out and stretch it into a large ring by making a hole in the center. Divide the dough into 16 pieces and shape each piece into a ball.
- Lightly flatten each dough ball and roll it out on a lightly floured surface into a wrapper approximately 3–4 inches in diameter. Keep the wrappers covered with a dry towel so they do not dry out.
- Place 2–3 tbsp of filling in the center of each wrapper. Pleat the edges while pinching them together, then twist to seal the bun.
- Lightly press each bun down and keep the finished buns covered with a towel while preparing the remaining buns.
- Heat a pan with a lid and add about 1 tbsp oil for every 4 buns. Place the buns creased-side down and lightly press them. Cook over medium heat for 4–5 minutes, until golden brown and crisp. Flip and cook until golden.
- Using the pan lid as protection, carefully add about 1 tbsp water per bun to the hot pan, then immediately cover with the lid.
- Steam the buns for about 5–6 minutes, or until the water has evaporated and the buns are cooked through.
- Remove the buns and repeat with the remaining batches. Serve hot with your favorite dipping sauce.
Notes
- Store cooked buns in an airtight container in the refrigerator for up to 5 days.
- To reheat refrigerated buns, pan-fry with a splash of water, warm them in a low oven, or microwave with a splash of water.
- Cooked buns can be frozen. Freeze them separately on a tray for 5–6 hours, then transfer to a freezer-safe bag or container.
- Frozen buns can be reheated directly from frozen in a pan, oven toaster, or steamer without thawing.
- Serve with a dipping sauce made with soy sauce, sugar, chili sauce, and sesame seeds if desired.
- Prep Time: 1 hour
- Cook Time: 30 minutes
- Category: Appetizer, Side Dish, Snack
- Method: Pan-Fry, Steam
- Cuisine: Asian, Chinese, Taiwanese