

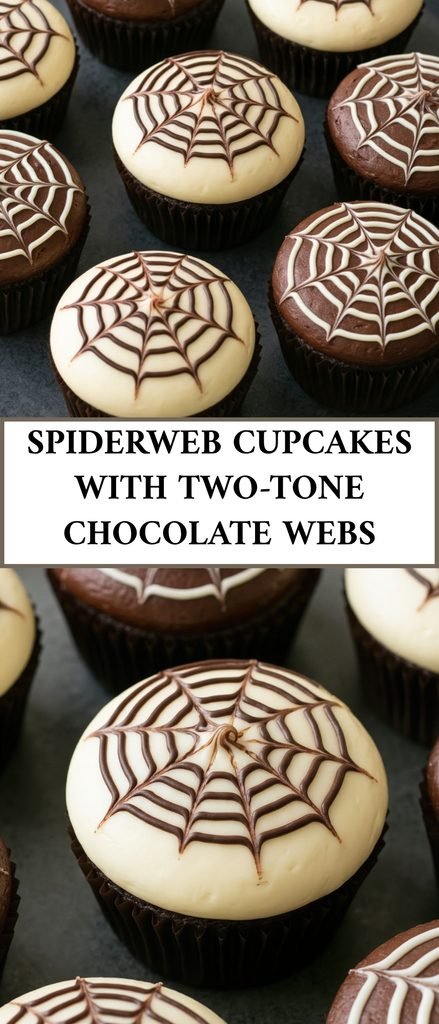
These Spiderweb Cupcakes are a spooky, chocolatey treat that’s perfect for Halloween! They start with soft, moist chocolate cupcakes topped with creamy ivory and cocoa buttercream, then get decorated with delicate contrasting chocolate spiderweb designs. They’re festive, eye-catching, and surprisingly fun to make.
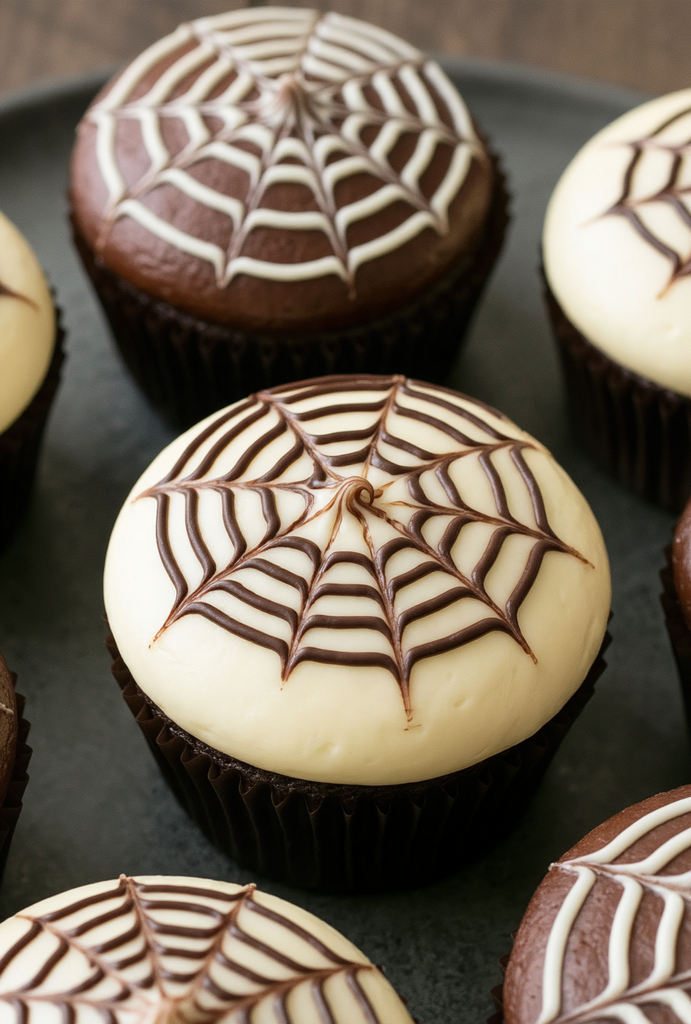
Each cupcake has a rich chocolate base, smooth homemade buttercream, and a beautiful spiderweb pattern created with melted white and dark chocolate. Whether you’re hosting a Halloween party, planning a spooky movie night, or looking for a fun seasonal baking project, these cupcakes are sure to impress.
The best part is that you don’t need special decorating equipment or advanced baking skills. With a piping bag and a toothpick, you can create charming spiderweb designs right at home!
Why You’ll Love These Spiderweb Cupcakes
- Perfect for Halloween: The spiderweb decorations make these cupcakes a fun addition to any spooky celebration.
- Rich chocolate flavor: The homemade chocolate cupcakes are soft, tender, and full of cocoa flavor.
- Two delicious frostings: Ivory and chocolate buttercream give you a beautiful contrast in every batch.
- Easy decorating technique: A few chocolate circles and a toothpick are all you need to create the spiderweb effect.
- Great for parties: The recipe makes 12 cupcakes, making it easy to share with family and friends.
Ingredients You’ll Need
For the Chocolate Cupcakes
- All-purpose flour: Provides structure and creates a soft cupcake crumb.
- Unsweetened natural cocoa powder: Gives the cupcakes their rich chocolate flavor.
- Granulated sugar: Adds sweetness and helps keep the cupcakes tender.
- Baking soda: Helps the cupcakes rise and develop a light texture.
- Fine salt: Balances the sweetness and enhances the chocolate flavor.
- Large egg: Adds structure and helps bind the ingredients.
- Neutral vegetable oil: Keeps the cupcakes moist and soft.
- Buttermilk: Adds moisture and a slight tang while helping create a tender crumb.
- Vanilla extract: Adds warmth and complements the chocolate.
For the Buttercream and Spiderwebs
- Unsalted butter: The base of the homemade buttercream. Make sure it’s softened before mixing.
- Powdered sugar: Sweetens and thickens the frosting while creating a smooth texture.
- Vanilla extract: Adds delicious flavor to the buttercream.
- Milk or heavy cream: Helps adjust the frosting to a smooth, spreadable consistency.
- Unsweetened natural cocoa powder: Turns half of the buttercream into a chocolate frosting.
- White chocolate melting wafers or white chocolate chips: Used to create spiderwebs on the chocolate-frosted cupcakes.
- Semisweet or dark chocolate chips: Used to make contrasting spiderweb designs on the ivory-frosted cupcakes.
For the Pan
- Dark paper cupcake liners: Give the cupcakes a classic Halloween look and make them easy to serve.
Equipment Needed
- Standard 12-cup muffin pan
- Dark paper cupcake liners
- Mixing bowls
- Whisk
- Wire cooling rack
- Electric mixer
- Offset spatula
- Microwave-safe bowls
- Small piping bags or resealable bags
- Toothpicks
How to Make Spiderweb Cupcakes
Step 1: Prepare the Oven and Cupcake Pan
Position a rack in the center of your oven and preheat to 350°F (175°C).
Line a standard 12-cup muffin pan with dark paper cupcake liners. Set the pan aside while you prepare the batter.
Step 2: Mix the Dry Ingredients
In a large mixing bowl, whisk together the all-purpose flour, cocoa powder, granulated sugar, baking soda, and salt.
Whisk until everything is evenly combined and there are no visible lumps of cocoa powder.
Step 3: Mix the Wet Ingredients
In a separate bowl, whisk together the egg, vegetable oil, buttermilk, and vanilla extract until smooth.
Combining the wet ingredients separately helps distribute everything evenly before adding them to the dry mixture.
Step 4: Make the Chocolate Cupcake Batter
Pour the wet ingredients into the bowl of dry ingredients.
Stir gently until no dry streaks remain. Avoid overmixing, as this can make the cupcakes dense instead of soft and tender.
Step 5: Fill the Cupcake Liners
Divide the batter evenly among the 12 cupcake liners, filling each about two-thirds full.
Try to distribute the batter evenly so the cupcakes bake at approximately the same rate.
Step 6: Bake the Cupcakes
Bake for 20–23 minutes, or until the centers spring back lightly when touched.
You can also insert a wooden toothpick into the center of a cupcake. It should come out clean or with a few moist crumbs.
Remove the pan from the oven and let the cupcakes cool in the pan for 5 minutes.
Step 7: Cool Completely
Transfer the cupcakes to a wire cooling rack and allow them to cool completely, about 45–60 minutes.
This step is important! If you add buttercream while the cupcakes are still warm, the frosting can soften or melt, making the spiderweb decorations difficult to create.
Step 8: Make the Buttercream Frosting
Add the softened butter to a large mixing bowl and beat with an electric mixer until creamy.
Gradually add the powdered sugar and remaining vanilla extract. Add 2–4 tablespoons of milk or heavy cream as needed until the buttercream becomes smooth and spreadable.
The frosting should be thick enough to hold its shape but soft enough to spread easily over the cupcakes.
Step 9: Divide and Color the Frosting
Divide the buttercream evenly between two bowls.
Leave one portion ivory. Add the cocoa powder to the second portion and beat until the cocoa is fully incorporated and the frosting is evenly chocolate-colored.
You now have two frosting colors to create the contrasting Halloween spiderweb designs.
Step 10: Frost the Cupcakes
Spread ivory buttercream over 6 cupcakes and chocolate buttercream over the remaining 6.
Use an offset spatula to smooth the tops into flat surfaces or gentle domes. A relatively even frosting surface will help the spiderweb patterns look neat and defined.
If the buttercream feels too soft, refrigerate the frosted cupcakes for 10–15 minutes before decorating.
Step 11: Melt the Chocolate
Place the white chocolate and dark chocolate in separate microwave-safe bowls.
Microwave each bowl in short bursts, stirring frequently, until the chocolate is completely melted and smooth.
Allow the melted chocolate to cool briefly. It should remain fluid enough to pipe but should not be hot when applied to the buttercream.
Step 12: Prepare the Piping Bags
Transfer the melted white chocolate and dark chocolate into separate small piping bags.
Alternatively, use resealable bags and snip off a very tiny corner.
A small opening is important because it helps you pipe thin, clean lines for the spiderweb designs.
Step 13: Create the Spiderweb Designs
Work with one cupcake at a time so the chocolate doesn’t set before you finish decorating.
For the ivory-frosted cupcakes, use dark chocolate. For the chocolate-frosted cupcakes, use white chocolate.
Pipe a small dot in the center of the cupcake, followed by 2–3 concentric circles or one loose spiral around it.
Step 14: Drag the Chocolate Into Spiderwebs
While the chocolate is still soft, use a toothpick to drag lines from the center dot toward the outer edge of the cupcake.
Make 6–8 evenly spaced strokes around each cupcake. Wipe the toothpick between strokes to keep the design clean.
As you drag through the circles, the chocolate forms a beautiful spiderweb pattern.
Step 15: Let the Decorations Set
Allow the cupcakes to stand at cool room temperature for 15–30 minutes, or until the chocolate spiderwebs are set.
Once the decorations are firm, your Spiderweb Cupcakes are ready to serve!
Tips for the Best Spiderweb Cupcakes
- Cool completely before frosting: Warm cupcakes can melt the buttercream and make decorating difficult.
- Keep the frosting surface smooth: Flat or gently domed frosting makes it easier to create clear spiderweb patterns.
- Use a small piping opening: Thin chocolate lines give you more control and create a delicate web design.
- Work one cupcake at a time: Pipe the chocolate circles and drag the toothpick through them before the chocolate starts to set.
- Wipe your toothpick: Clean it between each stroke to avoid dragging extra chocolate across the design.
- Watch the chocolate temperature: If the melted chocolate feels hot, let it cool before piping. If it becomes too thick, warm it briefly until smooth and fluid again.
- Chill soft buttercream: A quick 10–15-minute rest in the refrigerator can help the frosting hold its shape while you decorate.
Variations and Substitutions
Vanilla Spiderweb Cupcakes
If you prefer vanilla cupcakes, use your favorite vanilla cupcake recipe instead of the chocolate cupcake base. Keep the ivory and cocoa buttercream and use contrasting white and dark chocolate to create the same spiderweb decorations.
Make All Chocolate Cupcakes
For an extra-rich chocolate dessert, use cocoa buttercream on every cupcake. Decorate with white chocolate spiderwebs for a dramatic contrast.
Make All Ivory Cupcakes
Prefer a lighter frosting? Use ivory buttercream on all 12 cupcakes and decorate with dark chocolate webs.
Try Different Spiderweb Patterns
You don’t have to make every web exactly the same. Experiment with different numbers of circles, loose spirals, or slightly uneven lines for a fun handmade appearance.
How to Store Spiderweb Cupcakes
Store decorated cupcakes in a single layer in an airtight container at cool room temperature for up to 2 days.
If your kitchen is warm, refrigerate the cupcakes to help keep the buttercream and chocolate decorations firm. Before serving, allow them to come closer to room temperature for a softer frosting texture.
Avoid stacking decorated cupcakes because the frosting and spiderweb designs can get damaged.
Can You Make Spiderweb Cupcakes Ahead of Time?
Yes! You can bake the cupcakes up to 1 day ahead. Once they have cooled completely, store them in an airtight container until you’re ready to frost and decorate.
You can also freeze unfrosted cupcakes for up to 2 months. Thaw them before adding the buttercream and spiderweb designs.
Do not reheat decorated cupcakes.
Frequently Asked Questions
Can I make the cupcakes ahead of time?
Absolutely! Bake the chocolate cupcakes up to one day ahead and store them airtight once cool. You can frost and decorate them closer to serving time.
Why do my cupcakes need to cool completely before frosting?
If the cupcakes are warm, the buttercream can melt or become too soft. Completely cooled cupcakes provide a stable surface for spreading the frosting and creating the spiderweb designs.
How do I make the spiderweb pattern?
Pipe a small dot in the center of the frosting, followed by 2–3 circles or a loose spiral. Then drag a toothpick from the center toward the outer edge in 6–8 evenly spaced strokes.
Why is my spiderweb chocolate too thick to pipe?
Chocolate can thicken as it cools. Warm it briefly in the microwave, stirring until it becomes smooth and fluid again. Let it cool slightly if it feels hot before piping.
Can I use regular chocolate instead of melting wafers?
Yes. White chocolate chips work for the white spiderwebs, while semisweet or dark chocolate chips work for the dark designs. Melt them gently in short microwave bursts, stirring frequently.
Do I need to refrigerate the cupcakes?
Not necessarily if your kitchen is cool. They can be stored at cool room temperature for up to 2 days. If your kitchen is warm, refrigerate them to help the buttercream and chocolate decorations stay firm.
Can I freeze Spiderweb Cupcakes?
You can freeze the unfrosted chocolate cupcakes for up to 2 months. Thaw them before frosting and decorating. It’s best to add the buttercream and spiderweb designs after thawing.
When to Serve Spiderweb Cupcakes
These spooky cupcakes are a fun addition to any Halloween dessert table. Serve them at:
- Halloween parties and costume celebrations
- Spooky movie nights
- School Halloween parties
- Fall bake sales and potlucks
- Halloween birthday parties
- Family gatherings and seasonal celebrations
Arrange the cupcakes on a dark serving stand or platter to make the ivory and chocolate spiderwebs stand out.
Final Thoughts
These Spiderweb Cupcakes are a delicious way to add a little Halloween magic to your baking! With soft chocolate cupcakes, two creamy buttercream flavors, and beautiful contrasting chocolate webs, they’re just as fun to decorate as they are to eat.
The spiderweb technique is simple enough for beginner bakers, and the finished cupcakes look impressive on any Halloween dessert table. Make a batch, get creative with your designs, and enjoy a sweet and spooky treat!
Print
Spiderweb Cupcakes
- Total Time: 128 minutes
- Yield: 12 cupcakes
- Diet: Vegetarian
Description
These Spiderweb Cupcakes are rich chocolate cupcakes topped with ivory and cocoa buttercream, then decorated with contrasting chocolate spiderweb designs. They make a festive Halloween dessert with beautiful details and delicious chocolate flavor.
Ingredients
- For the Chocolate Cupcakes:
- 1 cup all-purpose flour (120 g)
- 1/2 cup unsweetened natural cocoa powder (42 g)
- 3/4 cup granulated sugar (150 g)
- 1 teaspoon baking soda
- 1/2 teaspoon fine salt
- 1 large egg
- 1/3 cup neutral vegetable oil
- 1/2 cup buttermilk
- 1 teaspoon vanilla extract
- For the Frosting and Spiderwebs:
- 1 cup unsalted butter, softened (225 g)
- 3 1/2 cups powdered sugar (420 g)
- 1 teaspoon vanilla extract
- 2 to 4 tablespoons milk or heavy cream
- 2 tablespoons unsweetened natural cocoa powder (about 10 g)
- 3 ounces white chocolate melting wafers or white chocolate chips (85 g)
- 3 ounces semisweet or dark chocolate chips (85 g)
- For the Pan:
- 12 dark paper cupcake liners
Instructions
- Position a rack in the center of the oven and preheat to 350°F (175°C). Line a standard 12-cup muffin pan with dark paper liners.
- In a large bowl, whisk together the flour, 1/2 cup cocoa powder, granulated sugar, baking soda, and salt.
- In a separate bowl, whisk together the egg, vegetable oil, buttermilk, and 1 teaspoon vanilla extract.
- Stir the wet ingredients into the dry ingredients just until no dry streaks remain. Avoid overmixing.
- Divide the batter evenly among the cupcake liners, filling each about two-thirds full.
- Bake for 20 to 23 minutes, until the centers spring back lightly and a wooden pick inserted into a cupcake comes out clean or with a few moist crumbs.
- Cool the cupcakes in the pan for 5 minutes, then transfer them to a wire rack. Let them cool completely for about 45 to 60 minutes.
- To make the buttercream, beat the softened butter until creamy. Gradually beat in the powdered sugar and remaining 1 teaspoon vanilla extract. Add enough milk or cream to create a smooth, spreadable consistency.
- Divide the buttercream evenly between two bowls. Leave one portion ivory and beat the remaining 2 tablespoons cocoa powder into the other portion.
- Spread ivory buttercream over 6 cupcakes and chocolate buttercream over the remaining 6. Smooth the tops flat or shape them into gentle domes.
- If the buttercream is too soft to hold fine lines, refrigerate the frosted cupcakes for 10 to 15 minutes.
- Melt the white chocolate and dark chocolate separately in microwave-safe bowls using short microwave bursts, stirring frequently until smooth. Let the chocolate cool briefly until fluid but not hot.
- Transfer each melted chocolate to a small piping bag or resealable bag with a tiny corner snipped off.
- Working with one cupcake at a time, pipe a small center dot and 2 to 3 concentric rings or a loose spiral. Use dark chocolate on ivory frosting and white chocolate on cocoa frosting.
- Immediately drag a toothpick from the center to the outer edge in 6 to 8 evenly spaced strokes to create the spiderweb design. Wipe the toothpick between strokes.
- Let the cupcakes stand at cool room temperature for 15 to 30 minutes, until the chocolate spiderwebs are set.
Notes
- Cool the cupcakes completely before frosting so the buttercream does not melt.
- Keep the frosting surface relatively flat so the spiderweb pattern stays easy to see.
- Work on one cupcake at a time and drag the toothpick through the chocolate while the lines are still wet.
- Use a very small opening in the piping bag to create thin, defined chocolate lines.
- If the melted chocolate thickens, warm it briefly until it flows smoothly. Let it cool slightly if it feels hot before piping.
- Refrigerate frosted cupcakes briefly if the buttercream is too soft to hold clean web lines.
- For vanilla spiderweb cupcakes, use your favorite vanilla cupcake recipe while keeping the dark liners, two buttercream colors, and contrasting chocolate webs.
- Bake the cupcakes up to 1 day ahead and store them airtight once cool.
- Store decorated cupcakes in a single layer at cool room temperature for up to 2 days. Refrigerate in a warm kitchen and bring them toward room temperature before serving.
- Unfrosted cupcakes can be frozen for up to 2 months. Do not stack or reheat decorated cupcakes.
- Prep Time: 45 minutes
- Cook Time: 23 minutes
- Category: Dessert, Cupcakes
- Method: Baking
- Cuisine: American