

Looking for a fun, easy, and adorable Halloween dessert? These Monster Sandwich Cookies are the perfect no-bake treat! Made with crunchy Chips Ahoy cookies, fluffy homemade buttercream frosting, bright Halloween colors, and silly candy eyes, they’re guaranteed to bring smiles to your Halloween celebration.
Each cookie sandwich is filled with a generous swirl of colorful frosting, making every monster unique. Give some monsters one eye, others two, or even three for a fun collection of silly Halloween characters!
Best of all, these Halloween monster cookies take just 20 minutes to prepare. They’re perfect for Halloween parties, school celebrations, movie nights, or a fun afternoon baking activity with kids.
Why You’ll Love These Monster Sandwich Cookies
- No baking required: Use store-bought chocolate chip cookies to make this recipe quick and effortless.
- Ready in 20 minutes: A simple buttercream filling and a few decorations are all you need.
- Perfect for Halloween: Colorful frosting and candy eyes turn ordinary cookies into adorable little monsters.
- Kid-friendly activity: Children can help choose frosting colors, assemble the sandwiches, and decorate their monsters.
- Easy to customize: Make every monster different with different colors and numbers of candy eyes.
- Great for parties: These colorful cookie sandwiches look adorable on Halloween dessert tables.
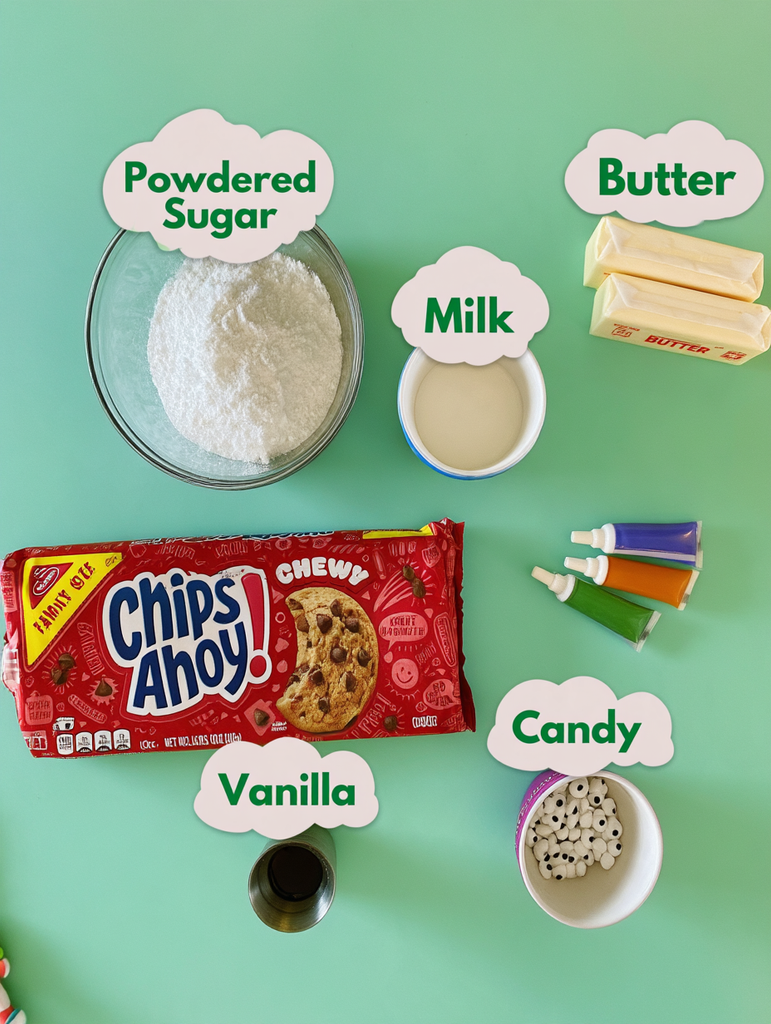
Ingredients You’ll Need
This recipe makes approximately 18–20 monster sandwich cookies.
For the Cookie Sandwiches
- 36–40 Chips Ahoy cookies: These store-bought chocolate chip cookies make a convenient, crunchy base for the sandwiches. Choose cookies that are similar in size and shape so they fit together nicely.
For the Buttercream Frosting
- 1 cup (2 sticks) unsalted butter: Use softened butter so it beats smoothly into a light, creamy frosting.
- 4 cups powdered sugar: Creates a sweet, fluffy buttercream with enough structure to hold the cookie sandwiches together.
- 2–3 tablespoons milk or heavy cream: Helps adjust the frosting consistency. Add gradually until it’s smooth and easy to pipe.
- 2 teaspoons vanilla extract: Adds a delicious vanilla flavor that pairs perfectly with the chocolate chip cookies.
For Decorating
- Halloween food coloring: Use your favorite Halloween shades, such as purple, orange, green, blue, and pink, to create colorful monster fillings.
- Candy eyes: These fun edible decorations give each sandwich its monster personality. Use one, two, or three eyes per cookie for different expressions.
Equipment Needed
You’ll need just a few basic tools:
- Medium mixing bowl
- Electric hand mixer or stand mixer
- Spatula
- Small bowls for coloring the frosting
- Piping bags
- Plain round piping tip (optional)
- Measuring cups and spoons
- Serving tray or airtight storage container
How to Make Monster Sandwich Cookies
Step 1: Prepare the Buttercream Frosting
In a medium mixing bowl, beat the softened butter and powdered sugar together using an electric mixer.
Start on low speed to prevent the powdered sugar from flying everywhere, then increase the speed as the mixture comes together.
Add the vanilla extract and 2 tablespoons of milk or heavy cream. Continue beating until the frosting becomes light, fluffy, and smooth.
If the frosting feels too thick, add a little more milk or cream, about 1 teaspoon at a time. If it becomes too thin, mix in a little extra powdered sugar.
Step 2: Divide and Color the Frosting
Divide the buttercream into separate small bowls, depending on how many Halloween colors you want to make.
Add a few drops of food coloring to each bowl and stir until the colors are evenly distributed and vibrant.
Some fun color combinations include:
- Purple: Perfect for silly little Halloween monsters.
- Neon green: A classic monster-inspired color.
- Orange: Great for a festive Halloween look.
- Blue: Creates fun, playful monster characters.
- Pink: Adds a cute and colorful touch.
Adjust the coloring gradually until you achieve your desired shades.
Step 3: Prepare the Piping Bags
Transfer each colored frosting into a separate piping bag.
You can use piping bags without tips or fit them with plain round piping tips for more controlled decorating.
If you don’t have piping bags, you can spread the frosting onto the cookies using a spoon or small spatula. The sandwiches will still look adorable!
Step 4: Pair the Cookies
Arrange the Chips Ahoy cookies into pairs based on their size and shape.
For each pair, turn one cookie upside down so the flat side is facing upward. This will be the bottom cookie of your sandwich.
Matching similar-sized cookies helps create neat, evenly shaped sandwiches.
Step 5: Add the Colorful Frosting
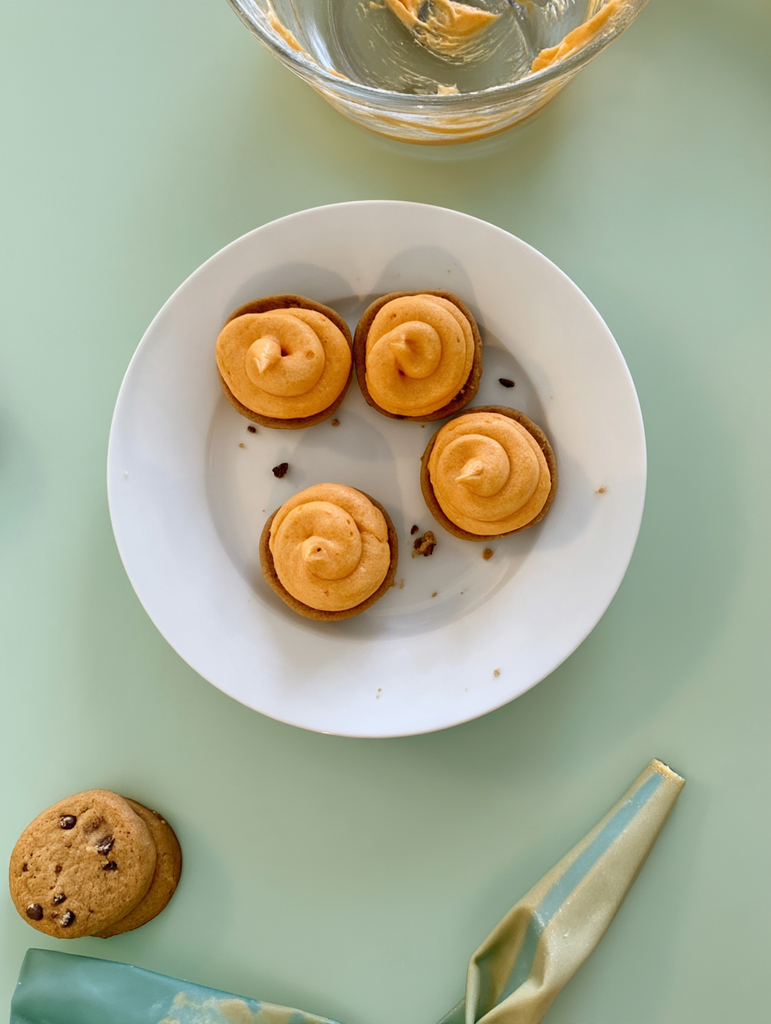
Pipe or spread a generous dollop of colored buttercream onto the flat side of each upside-down cookie.
You can use one frosting color per sandwich or combine multiple colors for a fun, multicolored monster effect.
Don’t be afraid to add a generous amount of frosting. It creates the fluffy filling that makes these cookie sandwiches so delicious.
Step 6: Assemble the Cookie Sandwiches
Place the second cookie on top of the frosting, gently pressing down until the filling spreads toward the edges.
Avoid pressing too firmly, as you don’t want to crack the cookies or squeeze out too much buttercream.
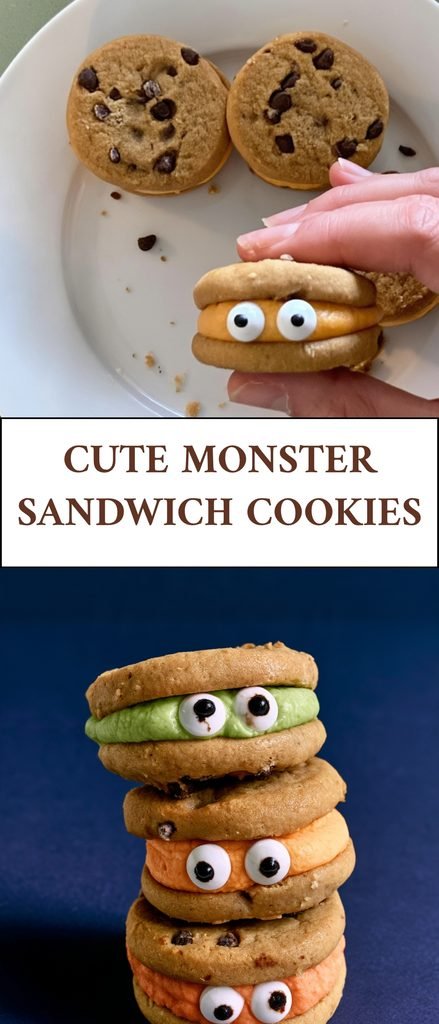
The colorful frosting should remain visible around the sides, creating the perfect space for your monster eyes.
Step 7: Add the Candy Eyes
While the frosting is still soft, gently press candy eyes into the exposed frosting around the sides of each sandwich.
Have fun with the decorations!
- Use two eyes for a classic monster look.
- Add three eyes for a silly, goofy monster.
- Use just one eye to create a cyclops monster.
- Mix different eye sizes for extra personality.
Every cookie can have its own unique look, making this a fun decorating activity for kids and adults.
Step 8: Let the Frosting Set
Arrange the finished monster sandwich cookies on a serving tray.
Allow the frosting to set slightly before serving or stacking the cookies. If you’re not serving them within a day or two, transfer them to an airtight container and refrigerate.
Your adorable Halloween monster cookies are ready to enjoy!
Tips for the Best Monster Sandwich Cookies
Use softened butter. Room-temperature butter blends more easily with powdered sugar and creates a smooth, fluffy buttercream. Avoid using melted butter because the frosting may become too soft.
Add the milk gradually. Start with 2 tablespoons and add more only if needed. You want frosting that’s soft enough to pipe but firm enough to hold the cookies together.
Choose vibrant food coloring. Gel food coloring is a great option because it provides strong color without adding too much liquid to the frosting.
Match your cookies by size. Pairing similar-sized cookies makes the sandwiches look neat and helps prevent uneven frosting distribution.
Don’t skimp on the frosting. A generous layer creates the colorful monster appearance and gives each sandwich a delicious creamy center.
Add the candy eyes immediately. Press the eyes into the frosting while it’s still soft so they stick securely.
Get creative with the designs. There are no rules when decorating monster cookies. Different colors, eye sizes, and eye placements make every sandwich unique.
Avoid stacking before the frosting sets. Give the sandwiches time to firm up slightly to prevent smudging or sticking together.
Fun Variations and Decorating Ideas
Make Rainbow Monster Cookies
Instead of using just one frosting color per sandwich, divide the frosting into several colors and pipe small sections of different shades onto each cookie.
You can create rainbow monsters with purple, green, orange, blue, and pink frosting.
Create Different Monster Faces
Make every sandwich look different by changing the number and placement of the candy eyes. Try one-eyed monsters, three-eyed monsters, or monsters with eyes positioned close together for a silly expression.
Use Different Cookies
Chips Ahoy cookies are convenient, but you can experiment with other store-bought cookies. Chocolate sandwich cookies, vanilla cookies, or homemade chocolate chip cookies can all make fun alternatives.
Choose cookies that are sturdy enough to hold the buttercream filling.
Try Different Frosting Flavors
Vanilla buttercream is a classic choice, but you can experiment with chocolate buttercream, strawberry frosting, or another favorite flavor.
Just make sure the frosting is thick enough to hold the sandwich together.
Add Halloween Sprinkles
For even more festive decorations, sprinkle Halloween-themed sprinkles around the exposed frosting. Orange, purple, and green sprinkles are especially fun.
Make Mini Monster Sandwiches
Use smaller cookies to create bite-sized monster sandwiches. These are perfect for party platters, dessert tables, and little hands.
How to Store Monster Sandwich Cookies
These cookie sandwiches are easy to prepare ahead of time, making them a convenient Halloween party dessert.
At room temperature: If using shelf-stable buttercream, store the cookies in an airtight container in a cool place for up to 1–2 days.
In the refrigerator: For longer storage, place the sandwiches in an airtight container and refrigerate for up to 3–4 days. If your frosting contains perishable ingredients, follow appropriate refrigeration guidelines.
Before serving: Let refrigerated cookies sit briefly at room temperature so the buttercream softens slightly.
Important decorating tip: If you live in a humid environment, be careful when moving the cookies from the refrigerator to a warm room. Condensation can form on the candy eyes and cause their black details to run. Keeping the cookies protected in an airtight container while they adjust to room temperature can help reduce this issue.
Frequently Asked Questions
Are Monster Sandwich Cookies no-bake?
Yes! This is a completely no-bake Halloween dessert. Store-bought Chips Ahoy cookies are used as the base, so all you need to do is prepare the frosting, assemble the sandwiches, and decorate them.
Can I make these cookies ahead of time?
Absolutely. You can prepare the buttercream and assemble the sandwiches ahead of your Halloween party. Store them in an airtight container according to the frosting storage requirements.
For the best appearance, add the candy eyes shortly before serving if you’re concerned about condensation or color running.
Can I use store-bought frosting?
Yes! Store-bought buttercream or vanilla frosting is a great shortcut. You can divide it into bowls, add food coloring, and pipe it directly onto the cookies.
Make sure the frosting is thick enough to hold the sandwiches together.
What kind of cookies work best?
Chips Ahoy cookies are a convenient option because they’re sturdy and have a delicious chocolate chip flavor. You can also use other firm chocolate chip cookies or your favorite store-bought variety.
How do I keep the frosting from squeezing out?
Use a thick, pipeable buttercream and avoid adding too much milk or cream. When assembling the sandwiches, gently press the top cookie into the frosting rather than pushing down firmly.
Can kids help make these Halloween cookies?
Definitely! Kids can help choose frosting colors, match the cookies, add the candy eyes, and decorate each monster. An adult can handle the electric mixer and help with piping if needed.
How many candy eyes should I use per cookie?
That’s completely up to you! Two eyes create a traditional monster look, while one eye makes a cyclops and three eyes create a funny, silly monster. Let everyone decorate their own.
Can I freeze Monster Sandwich Cookies?
Freezing is not the best option for these decorated sandwiches because the cookie texture and buttercream can change during thawing. For the freshest results, assemble them shortly before your event and refrigerate when needed.
What to Serve with Monster Sandwich Cookies
These fun Halloween treats pair perfectly with other festive desserts and drinks.
- Hot chocolate: A cozy drink that complements the chocolate chip cookies.
- Vanilla milkshakes: A creamy, sweet pairing that kids will love.
- Halloween cupcakes: Add colorful cupcakes to create a fun dessert table.
- Halloween brownies: Rich chocolate brownies make a delicious addition.
- Caramel popcorn: A crunchy snack that balances the soft buttercream filling.
- Apple cider: A festive fall drink for Halloween parties.
- Halloween candy platter: Serve alongside candy corn, chocolate treats, and other seasonal sweets.
Final Thoughts
These Monster Sandwich Cookies are proof that Halloween desserts don’t have to be complicated to be adorable! With crunchy chocolate chip cookies, fluffy colorful buttercream, and silly candy eyes, they make a fun and delicious no-bake treat for the whole family.
They’re quick to prepare, easy to customize, and perfect for getting kids involved in the Halloween fun. Whether you’re making them for a party, a school celebration, or a cozy afternoon activity, these little monsters are sure to be a hit.
Make a batch, get creative with the frosting colors, and give every monster its own personality. If you try this recipe, leave a comment and share your favorite monster design!
Print
Monster Sandwich Cookies
- Total Time: 20 minutes
- Yield: 18–20 sandwich cookies
- Diet: Vegetarian
Description
These Monster Sandwich Cookies are an easy, no-bake Halloween dessert made with crunchy Chips Ahoy cookies, fluffy homemade buttercream frosting in bright Halloween colors, and fun candy eyes. Cute, colorful, and customizable, they’re perfect for Halloween parties, festive family activities, and spooky-season treats. Ready in just 20 minutes!
Ingredients
- 36–40 Chips Ahoy cookies (enough to make 18–20 sandwich cookies)
- 1 cup (2 sticks) unsalted butter, softened
- 4 cups powdered sugar
- 2–3 tablespoons milk or heavy cream
- 2 teaspoons vanilla extract
- Food coloring in assorted Halloween colors
- Candy eyes, as needed
Instructions
- In a medium mixing bowl, beat the softened butter and powdered sugar together until combined.
- Add the vanilla extract and 2 tablespoons of milk or heavy cream. Beat until the frosting becomes light and fluffy. Add the remaining milk a little at a time if needed to reach a smooth, pipeable consistency.
- Divide the frosting into separate small bowls, depending on how many Halloween colors you want to make.
- Add a few drops of food coloring to each bowl and mix until the frosting reaches a vibrant color.
- Transfer each color of frosting into a piping bag fitted with no tip or a plain round tip. You can also spread the frosting with a spoon or spatula.
- Match the Chips Ahoy cookies into pairs according to their size and shape. Turn one cookie from each pair upside down so the flat side faces up.
- Pipe or spread a generous amount of colored buttercream onto the flat side of each upside-down cookie.
- Gently press the matching cookie on top of the frosting to create a sandwich cookie.
- While the frosting is still soft, press candy eyes into the exposed frosting around the edges so they peek out like monster eyes.
- Decorate each sandwich with two, three, or even one candy eye to create different monster faces.
- Allow the frosting to set before serving. Enjoy your colorful monster cookies!
Notes
- Choose your colors: Use bright Halloween colors such as purple, orange, green, and blue to make the monster cookies extra festive.
- Customize the monsters: Give each cookie a different look by using one, two, or three candy eyes.
- Frosting consistency: Add milk or heavy cream gradually. The buttercream should be fluffy and easy to pipe without being too runny.
- Easy decorating: Piping bags without tips work perfectly, but you can also use a small spoon or spatula to spread the frosting.
- Storage: If you are not serving the cookies within a day or two, store them in an airtight container in the refrigerator.
- Humidity tip: In humid environments, condensation can form when chilled cookies are moved to room temperature. This may cause the black coloring on the candy eyes to run. Allow the cookies to warm gradually in their closed container before opening.
- Serving: These cookies are perfect for Halloween parties, dessert tables, school celebrations, and fun activities with kids.
- Prep Time: 20 minutes
- Cook Time: 0 minutes
- Category: Dessert, Cookies
- Method: No-Bake
- Cuisine: American