

These classic thumbprint cookies are a beautiful addition to any holiday cookie platter. Each buttery cookie has a light, crisp texture and a sweet center filled with colorful fruit jam. They’re simple to make, easy to customize with your favorite preserves, and just the right size for sharing.
With a soft, buttery dough and a little jewel-like spot of jam in the middle, these cookies look festive without requiring complicated decorating. Make them with strawberry, apricot, or orange marmalade for a colorful assortment everyone will love.
Why You’ll Love These Thumbprint Cookies
- Simple ingredients: You only need a handful of everyday baking staples and your favorite jam.
- Buttery texture: The cookies bake up light and crisp with a delicate, tender bite.
- Easy to customize: Use different jams and preserves to create a variety of colors and flavors.
- Great for holidays: Their pretty jam centers make them a lovely addition to Christmas cookie trays, dessert tables, and homemade gift boxes.
- Make-ahead friendly: Prepare the shaped dough in advance or freeze baked cookies for later.
Ingredients You’ll Need
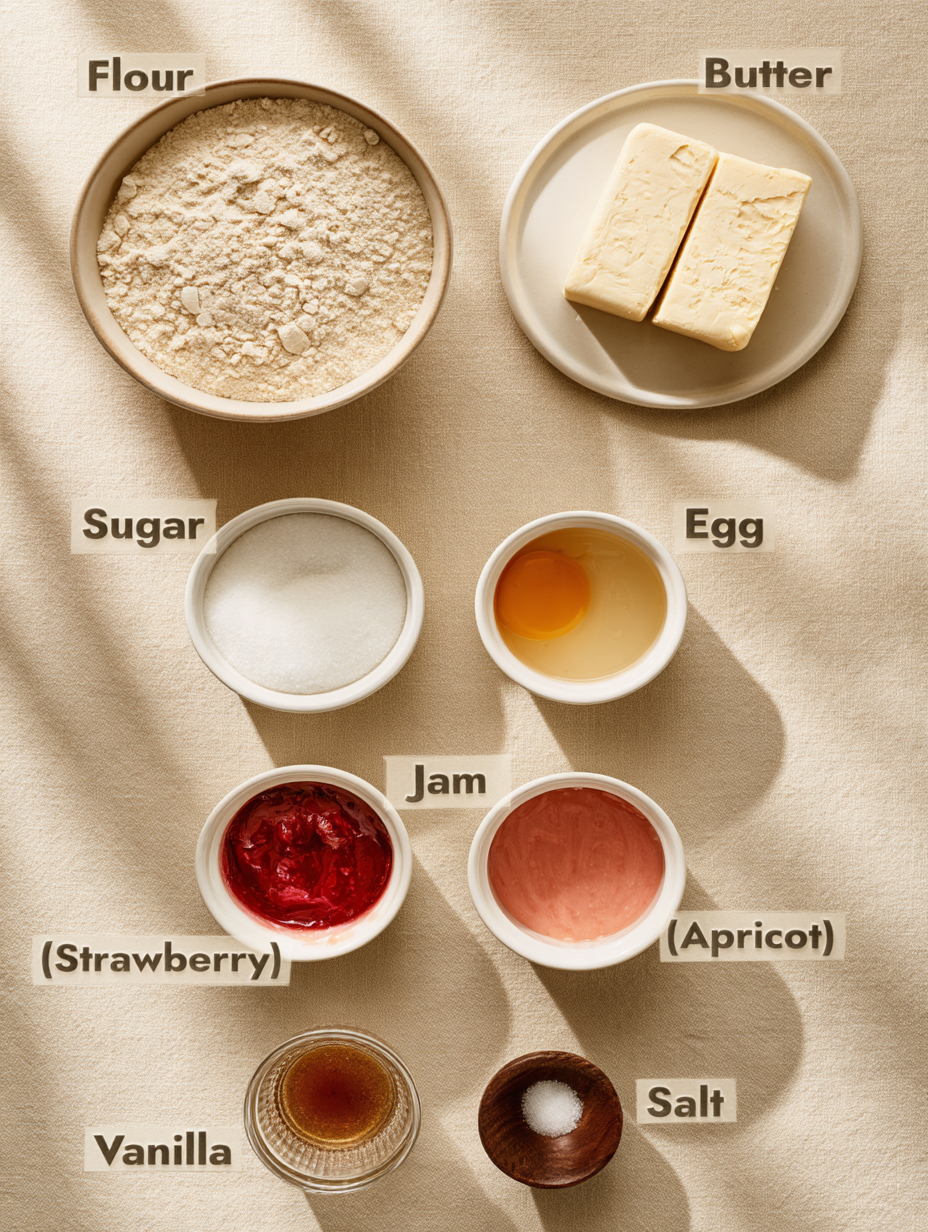
- Unsalted butter (8 ounces): Softened to 65–67°F (18–20°C), butter gives the cookies their rich flavor and tender, crisp texture.
- Granulated sugar (⅔ cup): Sweetens the dough and helps create a delicate cookie texture.
- Large egg (1): Adds moisture and helps bind the ingredients together. Bring it to room temperature before mixing.
- Vanilla extract (1 teaspoon): Adds warmth and enhances the buttery flavor.
- Kosher salt (¼ teaspoon): Balances the sweetness and brings out the other flavors.
- All-purpose flour (2¼ cups): Provides structure and creates a dough that holds its shape while baking.
- Jam (½ cup): Fills the centers with fruity sweetness. Strawberry, apricot, and orange marmalade are all delicious choices.
Equipment Needed
- Stand mixer fitted with a paddle attachment
- Three large baking sheets
- Parchment paper
- Measuring cups and spoons
- Small resealable plastic bag or piping bag
- Wire cooling rack
- Thumb, measuring spoon, or wooden spoon handle for making the indentations
How to Make Thumbprint Cookies
1. Prepare the Oven and Baking Sheets
Preheat the oven to 350°F (177°C), positioning the oven rack in the center. Line three large baking sheets with parchment paper.
2. Make the Cookie Dough
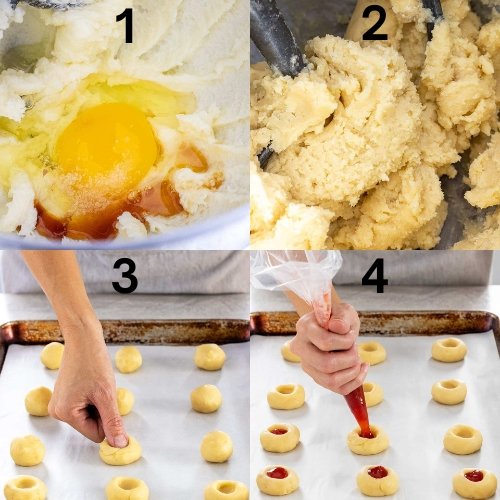
Add the softened butter and granulated sugar to the bowl of a stand mixer fitted with the paddle attachment. Cream on medium-low speed until the mixture looks light and fluffy, about 1 minute.
Add the room-temperature egg, vanilla extract, and salt. Mix on medium speed for about 1 minute, scraping down the sides of the bowl halfway through.
Gradually add the flour in three additions, mixing on low speed just until combined. Avoid overmixing, as this can make the cookies tougher. The finished dough should feel firm and not overly sticky.
3. Shape the Cookies
Scoop the dough into portions of about 1 tablespoon, or 22 grams each. Roll each portion between your hands to form a smooth ball.
Arrange the dough balls on the prepared baking sheets, leaving about 2 inches between each cookie to allow for spreading.
4. Make the Thumbprint Indentations
Use your thumb, a measuring spoon, or the end of a wooden spoon to gently press an indentation into the center of each dough ball.
The cookies should flatten to approximately 1½ inches in diameter. If needed, gently smooth or flatten the tops so the cookies have an even shape.
5. Add the Jam Filling
Stir the jam until smooth. Transfer it to a small resealable plastic bag or piping bag and snip off a small corner.
Pipe approximately ½ teaspoon of jam into the center of each cookie. If you’re using thicker preserves, you can spoon the filling into the indentations instead.
Avoid overfilling the centers, as too much jam can spill over the edges during baking.
6. Bake the Cookies
Bake one baking sheet at a time for 12–14 minutes, or until the edges and bottoms are lightly golden. The tops should remain relatively pale.
Let the cookies cool on the baking sheet for 5 minutes before carefully transferring them to a wire rack. Allow them to cool completely before storing or serving.

Tips for Perfect Thumbprint Cookies
- Use properly softened butter: Butter should be around 65–67°F (18–20°C). If it’s too warm or melted, the dough may become greasy and the cookies may spread too much.
- Bring the egg to room temperature: This helps it blend smoothly into the butter mixture.
- Don’t overmix the flour: Mix only until the flour disappears into the dough to keep the cookies tender.
- Keep the cookie sizes consistent: Portioning the dough into 22-gram balls helps the cookies bake evenly.
- Make gentle indentations: Press firmly enough to create a well for the jam, but avoid cracking the dough. Smooth any small cracks with your fingers.
- Don’t overfill: About ½ teaspoon of jam per cookie is enough to create a pretty center without overflowing.
- Bake one tray at a time: This helps maintain even baking and makes it easier to monitor the lightly browned edges.
Recipe Variations
Strawberry Thumbprint Cookies
Use strawberry jam for a bright red center. These look especially festive on a Christmas cookie platter.
Apricot Thumbprint Cookies
Fill the cookies with apricot preserves for a sweet, fruity flavor and a beautiful golden-orange center.
Orange Marmalade Thumbprint Cookies
Orange marmalade adds a sweet citrus flavor that pairs wonderfully with the buttery cookie dough.
Mixed Jam Thumbprint Cookies
Make a colorful assortment by using strawberry, apricot, and orange marmalade in the same batch. It’s an easy way to give your cookie platter more variety.
Serving Suggestions
These jam-filled thumbprint cookies are delicious on their own, but they’re also lovely served with:
- A cup of coffee, tea, or hot chocolate.
- Other Christmas cookies and holiday desserts.
- A scoop of vanilla ice cream for a simple dessert.
- A festive cookie platter with chocolate chip cookies, sugar cookies, and shortbread.
- Homemade holiday gift boxes tied with ribbon.
Frequently Asked Questions
Why are my thumbprint cookies spreading too much?
Butter that is too warm can cause excessive spreading. Make sure it is softened but still cool, ideally around 65–67°F (18–20°C). Also, avoid overmixing the dough.
How do I keep the dough from cracking when making the thumbprints?
Use room-temperature dough and press gently into the center. If small cracks appear around the edges, smooth them with your fingers before adding the jam.
Can I use any flavor of jam?
Yes! Strawberry, apricot, and orange marmalade are great options. You can use your favorite jam or preserves, adjusting the filling technique if the preserves are especially thick.
Should I add the jam before or after baking?
Add the jam before baking. Fill each indentation with approximately ½ teaspoon of jam, then bake the cookies as directed.
Can I make thumbprint cookie dough ahead of time?
Yes. The dough can be made, rolled into balls, and indented before storing in an airtight container in the refrigerator for up to 7 days. When ready to bake, arrange the cookies on prepared baking sheets and let them sit at room temperature for about 15 minutes.
How do I know when the cookies are done?
The edges and bottoms should be lightly golden, while the tops remain pale. This usually takes 12–14 minutes in a 350°F (177°C) oven.
Storage and Freezing
Room-temperature storage: Once completely cooled, store the cookies in an airtight container for up to 7 days.
Freezing baked cookies: Arrange the cooled cookies between layers of parchment paper in an airtight container or resealable freezer bag. Freeze for up to 3 months.
Freezing the dough: Shape and indent the dough before freezing. Store it for up to 3 months, then defrost before baking.
Make-ahead preparation: The shaped dough can be refrigerated in an airtight container for up to 7 days. Let the cookies sit at room temperature for approximately 15 minutes before baking.
Final Thoughts
These classic thumbprint cookies are everything a holiday cookie should be: buttery, lightly crisp, pretty, and filled with sweet fruit jam. With just a few simple ingredients and plenty of options for customizing the filling, they’re an easy treat to make for holiday gatherings, cookie exchanges, or an afternoon baking session.
Choose your favorite jams, make a colorful assortment, and enjoy sharing these homemade cookies with family and friends. If you try this recipe, leave a rating and review to let others know how they turned out!
Print
Classic Thumbprint Cookies with Jam (Buttery, Crisp, and Easy)
- Total Time: 50 minutes
- Yield: 34 cookies
Description
Colorful jam-filled thumbprint cookies are a classic holiday treat. These buttery cookies have a light, crisp texture and a sweet fruit jam center, making them perfect for sharing during the holidays.
Ingredients
- 8 ounces unsalted butter, softened to 65 to 67ºF (18 to 20ºC)
- ⅔ cup granulated sugar
- 1 large egg, room temperature
- 1 teaspoon vanilla extract
- ¼ teaspoon kosher salt
- 2 ¼ cups all-purpose flour
- ½ cup jam (strawberry, apricot, or orange marmalade)
Instructions
- Preheat the Oven: Set the oven rack to the center position and preheat the oven to 350ºF (177ºC). Line three large baking sheets with parchment paper.
- Make the Dough: In a stand mixer fitted with the paddle attachment, cream the butter and sugar on medium-low speed until light and fluffy, about 1 minute. Add the egg, vanilla, and salt. Mix on medium speed for 1 minute, scraping down the sides of the bowl halfway through.
- Add the Flour: Gradually add the flour in three additions, mixing on low speed just until combined. Do not overmix. The dough should be firm and not overly sticky.
- Portion the Dough: Roll the dough into 1-tablespoon (22-gram) balls. Place them on the prepared baking sheets, leaving about 2 inches between each cookie.
- Indent the Cookies: Use your thumb, a measuring spoon, or the end of a wooden spoon to make an indent in the center of each dough ball. The cookies should flatten to about 1½ inches in diameter. Gently flatten the tops if needed.
- Fill the Indents: Stir the jam until smooth. Transfer it to a small resealable plastic bag or piping bag. If using thick preserves, spoon the jam into each indent. Snip a small corner off the bag and pipe about ½ teaspoon of jam into each cookie.
- Bake: Bake one tray at a time for 12 to 14 minutes, until the edges and bottoms are lightly browned. The tops should remain pale.
- Cool: Leave the cookies on the baking sheet for 5 minutes, then transfer them to a wire rack to cool completely.
Notes
- Make Ahead: Prepare, roll, and indent the dough, then store it in an airtight container in the refrigerator for up to 7 days. Place the cookies on prepared baking sheets and let them sit at room temperature for about 15 minutes before baking.
- Storing: Store baked cookies in an airtight container for up to 7 days.
- Freezing Baked Cookies: Place cooled cookies between layers of parchment paper in an airtight container or resealable freezer bag. Freeze for up to 3 months.
- Freezing Dough: Shaped cookie dough can be frozen for up to 3 months. Defrost before baking.
- Jam Options: Use strawberry, apricot, or orange marmalade for colorful fruit-filled centers.
- Prep Time: 20 minutes
- Cook Time: 30 minutes
- Category: Dessert, Cookies
- Method: Bake
- Cuisine: American