

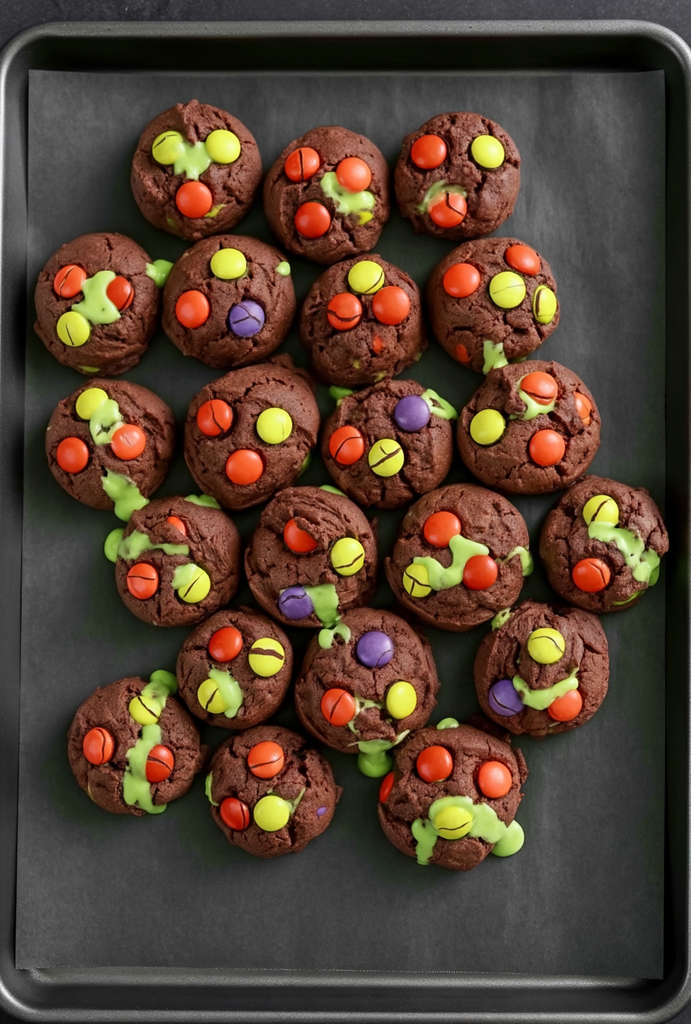
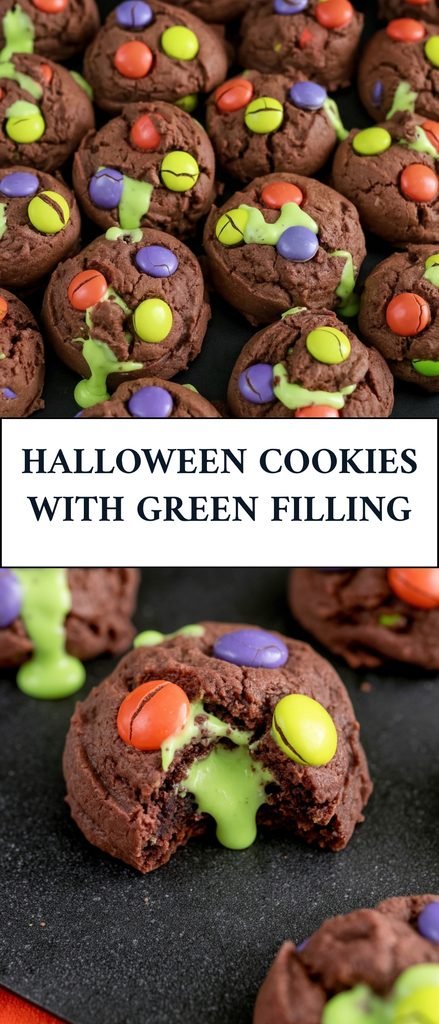
Get ready for a spooky-sweet Halloween treat! These Halloween Cookies with Green Filling are thick, soft cocoa cookies loaded with colorful candy-coated chocolates and filled with a bright neon-green vanilla frosting. Every bite combines rich chocolate flavor, crunchy candy pieces, and a creamy surprise in the center.
With their orange, purple, and green candies and eye-catching green filling, these cookies are perfect for Halloween parties, trick-or-treat celebrations, school events, or a festive dessert table. They look impressive but are surprisingly easy to make with simple baking ingredients and ready-made vanilla frosting.
If you’re looking for a fun Halloween cookie recipe that tastes as good as it looks, these colorful stuffed chocolate cookies are sure to be a hit!
Why You’ll Love These Halloween Cookies
- Fun Halloween colors: Orange, purple, and neon-green candy-coated chocolates make these cookies festive and colorful.
- Rich chocolate flavor: Unsweetened cocoa powder creates a deliciously deep chocolate cookie.
- Thick and chewy texture: Softened butter, a little cornstarch, and properly shaped dough help create thick cookies with tender centers.
- Surprise green filling: Each cookie is filled with sweet vanilla frosting colored bright green for a spooky Halloween effect.
- Easy to customize: Change the candy colors, frosting shade, or filling flavor to match your Halloween theme.
- Perfect for parties: These cookies are a fun addition to Halloween dessert tables, bake sales, and holiday cookie boxes.
Ingredients You’ll Need
Here’s everything you need to make 18 Halloween cookies.
For the Chocolate Cookie Dough
- All-purpose flour: Provides structure and helps the cookies hold their shape.
- Unsweetened cocoa powder: Gives the cookies their rich chocolate flavor and dark color.
- Cornstarch: Helps create a softer, more tender cookie texture.
- Baking soda: Gives the cookies a little lift and helps them spread.
- Fine salt: Balances the sweetness and enhances the chocolate flavor.
- Unsalted butter: Use softened butter, not melted butter, to help the cookies stay thick.
- Granulated sugar: Adds sweetness and helps create the cookie texture.
- Light brown sugar: Adds moisture and a subtle caramel flavor, keeping the cookies soft and chewy.
- Large eggs: Bind the ingredients together and provide structure.
- Vanilla extract: Adds warmth and enhances the chocolate flavor.
- Candy-coated chocolates: Use orange, purple, and neon-green candies for a classic Halloween color combination. Reserve some for decorating the tops.
For the Green Filling
- Vanilla frosting: Creates the sweet, creamy filling inside each cookie. Store-bought frosting makes this step quick and easy.
- Neon-green gel food coloring: Gives the frosting its bright Halloween color. Gel coloring is ideal because it provides strong color without adding much liquid.
- Milk: Optional, used in small amounts to make the frosting easier to pipe.
Equipment Needed
You’ll need a few basic baking tools:
- 2 light-colored baking sheets
- Parchment paper
- Medium mixing bowl
- Large mixing bowl
- Electric mixer
- Whisk
- Cookie scoop
- Spatula
- Wire cooling rack
- Piping bag or squeeze bottle
- Small round piping tip
How to Make Halloween Cookies with Green Filling
Step 1: Prepare the Oven and Baking Sheets
Preheat your oven to 350°F (175°C).
Line two light-colored baking sheets with parchment paper. Using light-colored baking sheets helps prevent the cookie bottoms from browning too quickly.
Step 2: Mix the Dry Ingredients
In a medium mixing bowl, whisk together the flour, cocoa powder, cornstarch, baking soda, and salt.
Make sure the cocoa powder is evenly distributed and break up any large lumps. Set the dry mixture aside.
Step 3: Cream the Butter and Sugars
In a large bowl, beat the softened butter, granulated sugar, and brown sugar with an electric mixer until creamy and well combined.
This usually takes a couple of minutes. Scrape down the sides of the bowl as needed so everything mixes evenly.
Step 4: Add the Eggs and Vanilla
Add the eggs and vanilla extract to the butter mixture.
Beat until combined, scraping down the sides of the bowl if necessary. The mixture should look smooth and creamy.
Step 5: Add the Dry Ingredients
Gradually add the dry ingredient mixture to the wet ingredients.
Mix just until no dry flour streaks remain. Avoid overmixing, as this can make the cookies dense or tough.
Step 6: Fold in the Halloween Candies
Add 1 cup of the candy-coated chocolates to the dough and gently fold them in with a spatula.
Reserve the remaining ½ cup for decorating the cookie tops. Mixing the candies into the dough gives every cookie colorful chocolate pieces throughout.
Step 7: Chill the Cookie Dough
If the dough feels sticky or too soft to scoop, cover the bowl and refrigerate it for about 20 minutes.
This short chilling period helps firm up the butter and makes the dough easier to handle. It also helps reduce spreading during baking.
Step 8: Scoop and Shape the Cookies
Scoop approximately 2 tablespoons of dough per cookie and place the portions onto the prepared baking sheets.
Leave about 3 inches between each dough ball to give the cookies room to spread. Keep the dough balls tall rather than flattening them.
Press 3–5 of the reserved candy-coated chocolates into the top of each dough ball, using a mixture of Halloween colors when possible.
Step 9: Bake the Cookies
Bake one baking sheet at a time on the center rack for approximately 9–11 minutes.
Start checking at the 9-minute mark. The edges should look set, while the tops should be puffed and slightly cracked. The centers should still look soft.
Don’t wait until the centers look completely firm. The cookies will continue to set as they cool on the baking sheet.
Step 10: Cool Completely
Remove the cookies from the oven and let them rest on the baking sheet for 8–10 minutes.
Carefully transfer them to a wire rack and allow them to cool completely before adding the filling.
This step is important because warm cookies can melt the frosting and cause it to leak.
Step 11: Prepare the Green Frosting
Place the vanilla frosting in a small bowl and stir in the neon-green gel food coloring.
Start with approximately ¼ teaspoon, then add more if needed to reach your preferred bright green shade.
If the frosting is too thick to pipe, add milk 1 teaspoon at a time until it reaches a smooth, pipeable consistency. Be careful not to make it too thin.
Step 12: Fill the Cookies
Transfer the green frosting to a piping bag fitted with a small round tip, or use a squeeze bottle with a narrow opening.
Insert the tip into the bottom or side of each completely cooled cookie. Gently squeeze in approximately 1–2 teaspoons of frosting.
Stop piping when a little green frosting begins to peek through a crack or edge. Avoid overfilling, as too much frosting can split the cookies.
Step 13: Let the Filling Set
Allow the filled cookies to stand for 15–20 minutes before serving or stacking.
This gives the frosting a little time to settle and makes the cookies easier to handle.
Serve them on a Halloween dessert platter and enjoy the spooky green surprise inside!
Tips for the Best Halloween Cookies
Use softened butter, not melted butter. Softened butter helps the cookies maintain a thicker shape. Melted butter can make the dough too loose and encourage excessive spreading.
Measure the flour correctly. Too much flour can make the cookies dry. For the best results, use a kitchen scale or spoon the flour into your measuring cup and level it off.
Chill sticky dough. If the dough is difficult to scoop, refrigerate it for about 20 minutes. This makes shaping easier and helps control spreading.
Keep the dough balls tall. Don’t flatten the cookie dough before baking. Taller dough portions help create thick cookies with soft centers.
Save candies for decorating. Pressing a few extra candy-coated chocolates into the tops makes the cookies look colorful and festive after baking.
Don’t overbake. Remove the cookies when the edges are set but the centers still look soft. They will continue baking slightly on the hot baking sheet.
Cool completely before filling. Warm cookies can melt the frosting, making it difficult to keep the filling inside.
Pipe slowly. Add the frosting gradually and stop when a little green filling becomes visible. Overfilling can cause the cookies to crack or split.
Variations and Substitutions
Change the Halloween Candy Colors
Orange, purple, and green create a classic Halloween look, but you can use any candy colors you like. Black, orange, and purple are another fun combination for a spooky dessert table.
Try a Different Frosting Flavor
Vanilla frosting works beautifully with the rich cocoa cookies, but chocolate, cream cheese-style, or buttercream frosting can also be used. Choose a light-colored frosting if you want the green food coloring to show clearly.
Make the Filling Brighter
For an extra-vibrant green center, add a little more neon-green gel food coloring until you reach your preferred shade. Add it gradually to avoid making the frosting too dark.
Use Different Chocolate Candies
If you can’t find Halloween-colored candy-coated chocolates, use regular chocolate candies in your favorite colors. You can also use Halloween sprinkles for extra decoration.
Add a Spooky Decoration
For an extra Halloween touch, decorate the finished cookies with candy eyes, festive sprinkles, or a drizzle of melted white chocolate.
Make Them Smaller
You can use a smaller cookie scoop to make bite-sized Halloween cookies. Reduce the baking time and check them early, since smaller cookies bake faster.
How to Store Halloween Cookies
Because these cookies contain a frosting filling, storage depends on the type of frosting you use.
At room temperature: Cookies made with shelf-stable frosting can be stored in an airtight container in a cool place for up to 2 days. Arrange them in a single layer or separate layers with parchment paper.
In the refrigerator: If you use homemade frosting containing perishable ingredients, refrigerate the filled cookies in an airtight container for up to 3 days.
Freezing unfilled cookies: Allow the baked chocolate cookies to cool completely, then place them in a freezer-safe container. Freeze for up to 2 months. Thaw before filling with the green frosting.
Make-ahead tip: You can bake the cookies ahead of time and prepare the frosting separately. Fill the cookies once they have thawed and are completely cool.
Frequently Asked Questions
Why did my Halloween cookies spread too much?
Cookies can spread excessively if the butter is too warm, melted, or the dough is too soft. Use softened butter rather than melted butter, and chill the dough for about 20 minutes if it feels sticky.
Can I make these cookies ahead of time?
Yes! You can bake the cookies in advance and store them unfilled. Keep them in an airtight container or freeze them for up to two months. Prepare the green frosting and fill the cookies once you’re ready to serve.
Can I use store-bought frosting?
Absolutely. Store-bought vanilla frosting is a convenient option and works well for the filling. Simply mix in neon-green gel food coloring and adjust the consistency with a little milk if needed.
Can I use liquid food coloring instead of gel?
You can, but gel food coloring is recommended because it provides a more concentrated color without adding much liquid. Liquid coloring may require more product to achieve the same bright green shade and can thin the frosting.
How much frosting should I put inside each cookie?
Use approximately 1–2 teaspoons per cookie. Pipe slowly and stop as soon as a little frosting begins to peek through a crack or edge.
Why should the cookies cool completely before filling?
The frosting can melt or become runny when added to warm cookies. Cooling them completely helps the filling maintain its shape and stay inside the cookies.
Can I freeze the filled cookies?
It’s best to freeze the unfilled cookies and add the frosting after thawing. This helps preserve the cookie texture and prevents potential changes in the frosting consistency.
Can I make these cookies without the filling?
Yes! The chocolate cookies are delicious on their own. Simply skip the frosting and serve them as thick Halloween chocolate cookies packed with colorful candy-coated chocolates.
What to Serve with Halloween Cookies
These colorful cookies are perfect for a Halloween party or a festive movie night. Pair them with other sweet treats and fun drinks for a complete dessert spread.
- Hot chocolate: A cozy drink that pairs beautifully with rich cocoa cookies.
- Vanilla milkshakes: A creamy, cool drink that balances the chocolate flavor.
- Apple cider: A festive fall drink that complements the Halloween season.
- Halloween cupcakes: Add another colorful dessert to your party table.
- Caramel popcorn: A crunchy, sweet snack that works well alongside soft cookies.
- Candy corn and Halloween treats: Create a fun dessert platter with a variety of seasonal sweets.
Final Thoughts
These Halloween Cookies with Green Filling are the perfect combination of rich chocolate, colorful candy, and creamy vanilla frosting. Their thick, soft texture and bright neon-green centers make them a fun and memorable Halloween dessert.
They’re easy enough to bake at home, festive enough for a party, and delicious enough that everyone will want another one. Make a batch for your next Halloween celebration and enjoy the spooky surprise hidden inside every cookie!
If you try this recipe, leave a comment and share how your Halloween cookies turned out!
Print
Halloween Cookies with Green Filling
- Total Time: 95 minutes
- Yield: 18 cookies
- Diet: Vegetarian
Description
These Halloween Cookies are thick, fudgy cocoa cookies packed with colorful candy-coated chocolates and filled with bright neon-green vanilla frosting. With their festive colors, soft centers, and creamy surprise filling, they’re a fun and delicious Halloween dessert perfect for parties and spooky celebrations.
Ingredients
- For the Cookie Dough:
- 2 cups all-purpose flour (240 g)
- 3/4 cup unsweetened cocoa powder (65 g)
- 2 teaspoons cornstarch
- 1 teaspoon baking soda
- 1/2 teaspoon fine salt
- 3/4 cup unsalted butter, softened (170 g)
- 3/4 cup granulated sugar (150 g)
- 1/2 cup packed light brown sugar (105 g)
- 2 large eggs
- 2 teaspoons vanilla extract
- 1 1/2 cups orange, purple, and neon-green candy-coated chocolate candies, divided (about 255 g)
- For the Green Filling:
- 1 cup vanilla frosting (about 240 g)
- Neon-green gel food coloring, about 1/4 teaspoon or as needed
- 1–2 teaspoons milk, if needed
Instructions
- Preheat the oven to 350°F (175°C). Line two light-colored baking sheets with parchment paper.
- In a medium bowl, whisk together the flour, cocoa powder, cornstarch, baking soda, and salt. Set aside.
- In a large mixing bowl, beat the softened butter, granulated sugar, and brown sugar until creamy and well combined.
- Add the eggs and vanilla extract. Beat until fully incorporated.
- Gradually add the dry ingredients to the butter mixture. Mix just until no dry streaks remain, being careful not to overmix.
- Fold in 1 cup of the candy-coated chocolate candies. Reserve the remaining 1/2 cup for topping.
- Cover and refrigerate the dough for about 20 minutes if it feels sticky or too soft to scoop.
- Scoop the dough into 2-tablespoon portions and place them on the prepared baking sheets, spacing them about 3 inches apart. Keep the dough balls tall and do not flatten them.
- Press 3–5 reserved candies into the top of each dough ball, using a colorful mix when possible.
- Bake one sheet at a time on the center oven rack for 9–11 minutes, checking at 9 minutes. Remove the cookies when the edges are set, the tops are puffed and cracked, and the centers still look soft.
- Allow the cookies to cool on the baking sheet for 8–10 minutes before transferring them to a wire rack to cool completely.
- To make the filling, stir the neon-green gel food coloring into the vanilla frosting until the desired color is reached. Add milk 1 teaspoon at a time only if needed to make the frosting easy to pipe.
- Fit a piping bag or squeeze bottle with a small round tip. Insert the tip into the bottom or side of each completely cooled cookie and pipe in about 1–2 teaspoons of green frosting. Stop when a little frosting appears through a crack or at the edge.
- Let the filled cookies stand for 15–20 minutes before serving or stacking.
Notes
- Use softened butter: Avoid melted butter, as softened butter helps the cookies maintain their thick shape.
- Chill sticky dough: Refrigerate the dough for about 20 minutes if it becomes too soft. This helps reduce spreading during baking.
- Keep cookies thick: Shape the dough into tall balls and do not flatten them before baking. Leave enough space between cookies.
- Do not overbake: Remove the cookies while the centers still look soft. They will continue setting as they cool on the baking sheet.
- Cool before filling: Make sure the cookies are completely cool before piping in the frosting so the filling does not melt or leak.
- Pipe gently: Fill slowly and stop as soon as the green frosting begins to peek through. Adding too much filling can split the cookies.
- Storage: Store filled cookies in an airtight container in a single layer or separated by parchment paper. Cookies made with shelf-stable frosting can be kept at cool room temperature for up to 2 days. Refrigerate cookies made with perishable homemade frosting for up to 3 days.
- Freezing: Unfilled cookies can be frozen for up to 2 months. Thaw completely before adding the green frosting filling.
- Color variation: Adjust the amount of neon-green gel food coloring to achieve your preferred Halloween shade.
- Prep Time: 25 minutes
- Cook Time: 20 minutes
- Category: Dessert, Cookies
- Method: Baking
- Cuisine: American