
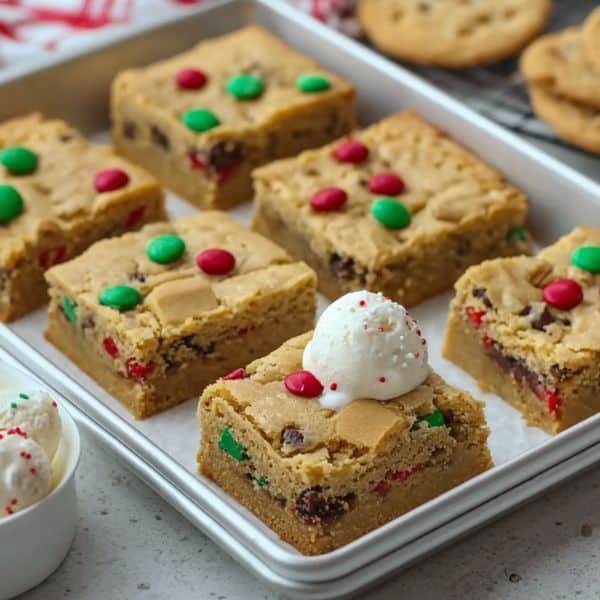
Christmas Cookie Bars are one of the easiest and most crowd-pleasing treats you can bake during the holidays. Soft, chewy, buttery, and packed with festive add-ins like M&Ms, chocolate chips, and holiday sprinkles, these bars deliver all the comfort of classic Christmas cookies without the fuss of scooping individual portions. Whether you’re preparing a dessert platter, hosting a holiday party, participating in a cookie exchange, or simply enjoying cozy baking at home, these cookie bars promise big flavor with minimal effort. With just a handful of pantry staples and a straightforward mixing process, they come together quickly and bake into a colorful, irresistible treat that both kids and adults adore. This article will walk you through the ingredients, preparation steps, expert tips, variations, serving suggestions, storage instructions, and helpful FAQs—all organized professionally using H1, H2, and H3 headings and written for clarity, consistency, and publication-ready polish.
Ingredients
Base Ingredients
1 cup unsalted butter, melted
1 cup brown sugar
½ cup granulated sugar
2 large eggs
2 tsp vanilla extract
2 ½ cups all-purpose flour
1 tsp baking soda
½ tsp salt
Festive Mix-Ins
1 cup holiday M&Ms
½ cup chocolate chips
½ cup festive sprinkles
These ingredients create cookie bars that are rich, chewy, flavorful, and visually perfect for the season. The combination of melted butter, brown sugar, and vanilla adds depth and caramel notes, while the flour, baking soda, and salt create a sturdy yet tender cookie base. The mix-ins give these bars that classic Christmas look and delicious bursts of chocolate in every bite.
Preparation Method
Step 1: Prepare Your Baking Pan
Begin by preheating your oven to 350°F (175°C). Line a 9×13-inch baking pan with parchment paper, leaving some overhang on the sides for easy removal after baking. This step is essential for clean slicing and helps prevent the bars from sticking. If you prefer, you can also lightly grease the pan, but parchment paper ensures the best results.
Step 2: Combine the Wet Ingredients
In a large mixing bowl, whisk together the melted unsalted butter, brown sugar, and granulated sugar until smooth and well blended. The melted butter contributes to the cookie bars’ chewy texture, while the brown sugar adds extra moisture and sweetness. Add the two large eggs and whisk again until fully incorporated. Stir in the vanilla extract. This wet mixture forms the flavorful, rich base of your Christmas cookie bars.
Step 3: Add the Dry Ingredients
In a separate bowl, whisk together the all-purpose flour, baking soda, and salt. Mixing the dry ingredients separately ensures the baking soda distributes evenly throughout the dough, preventing uneven rising or dense spots. Gradually add the dry mixture to the wet mixture, folding until just combined. Be careful not to overmix, as doing so can make the bars tough instead of tender and chewy. The dough should be thick but cohesive.
Step 4: Add the Festive Mix-Ins
Gently fold in the holiday M&Ms, chocolate chips, and festive sprinkles. Reserve a small handful of each to sprinkle on top of the dough before baking. Folding them in with a spatula prevents the candies and chips from cracking or breaking apart. The sprinkles add beautiful color throughout the dough, giving these bars a cheerful, seasonal finish.
Step 5: Press the Dough Into the Pan
Transfer the dough to the prepared baking pan. Use a spatula or clean hands to press it evenly into the pan. Try to spread the dough as smoothly as possible so the bars bake evenly. Scatter the reserved M&Ms, chocolate chips, and sprinkles on top and lightly press them into the dough. This step ensures every slice looks festive and inviting.
Step 6: Bake the Cookie Bars
Place the baking pan in the preheated oven and bake for 22–28 minutes, or until the edges are lightly golden and set while the center remains soft. The bars will continue to firm up slightly as they cool. Avoid overbaking, as this can make the bars dry rather than chewy. For the perfect texture, remove the bars when the center still looks lightly underdone.
Step 7: Cool and Slice
Allow the cookie bars to cool completely in the pan. Cooling helps them firm up and makes slicing cleaner and easier. Once cooled, use the parchment overhang to lift the entire slab out of the pan. Place it on a cutting board and slice into squares or rectangles. You can cut them small for parties or larger for gifting.

Tips for Perfect Christmas Cookie Bars
Use Melted Butter for Chewiness
Melted butter makes cookie bars denser and chewier than creamed butter, giving them the ideal fudgy cookie texture.
Don’t Overmix the Dough
Once you add the flour mixture, mix only until combined. Overmixing can toughen the cookie bars.
Reserve Mix-Ins for Topping
Adding candies and sprinkles on top ensures the bars look colorful even after baking.
Avoid Overbaking
Remove the bars from the oven when the center is still soft. They will finish setting as they cool. Slight underbaking creates the best texture.
Use High-Quality Vanilla Extract
Vanilla enhances the flavor profile of the bars. Pure vanilla works best for rich, aromatic results.
Flavor Variations
White Chocolate Peppermint
Replace chocolate chips with white chocolate chips and add crushed peppermint candies.
Double Chocolate
Add ¼ cup cocoa powder to the flour mixture and increase chocolate chips for ultra-chocolatey bars.
Salted Caramel
Drizzle caramel sauce over the baked bars and sprinkle lightly with flaky sea salt.
Peanut Butter M&M Bars
Replace half a cup of melted butter with peanut butter for a nutty twist.
Cranberry White Chocolate
Add dried cranberries and white chocolate chips for a beautiful red-and-white holiday version.
Serving Suggestions
Christmas Cookie Bars pair beautifully with holiday beverages such as hot cocoa, eggnog, spiced cider, or peppermint coffee. They make excellent additions to dessert boards, cookie platters, school treats, or gift boxes. Serve them warm for a melty chocolate experience or chilled for a firmer bite. They’re also great topped with vanilla ice cream for a festive dessert.
Storage and Make-Ahead Instructions
Once cooled, store the cookie bars in an airtight container at room temperature for up to 5 days. To keep them extra soft, place a slice of bread in the container; the bars will absorb moisture from the bread and remain chewy.
For longer storage, freeze the bars in a freezer-safe container or bag for up to 2 months. Place parchment paper between layers to prevent sticking. Thaw at room temperature before serving. You can also freeze the unbaked dough by pressing it into the pan, wrapping it tightly, and freezing. Bake from frozen, adding a few minutes to the baking time.
Frequently Asked Questions
1. Can I use a different size pan?
A 9×9-inch pan will make thicker bars but may require extra baking time.
2. Can I substitute the M&Ms?
Yes, use chopped chocolate, crushed peppermint, or any holiday candies you like.
3. Can I make these gluten-free?
Use a 1:1 gluten-free baking flour for best results.
4. Can I reduce the sugar?
You can reduce up to ¼ cup of sugar, but the bars will be slightly less chewy.
5. Do sprinkles melt in the oven?
Most festive sprinkles hold up well. Avoid nonpareils, which may bleed color.
6. Can I add nuts?
Yes, chopped pecans or walnuts add great flavor and texture.
7. How do I make the bars softer?
Slightly underbake them and store with a piece of bread to maintain softness.
8. Can I make this dough ahead?
Yes, refrigerate up to 48 hours before baking or freeze for longer storage.
9. Can kids help with this recipe?
Absolutely. The steps are simple and perfect for family holiday baking.
10. Can I double the recipe?
Yes, double the ingredients and bake in two pans or a larger sheet pan, adjusting baking time as needed.

Christmas Cookie Bars: Festive, Chewy, and Perfect for Holiday Celebrations
- Total Time: 35 minutes
- Yield: 24 bars
- Diet: Vegetarian
Description
These Christmas Cookie Bars are soft, chewy, festive, and loaded with holiday M&Ms, chocolate chips, and sprinkles—perfect for parties, gifting, or easy holiday baking!
Ingredients
- 1 cup unsalted butter, melted
- 1 cup brown sugar
- ½ cup granulated sugar
- 2 large eggs
- 2 tsp vanilla extract
- 2 ½ cups all-purpose flour
- 1 tsp baking soda
- ½ tsp salt
- 1 cup holiday M&Ms
- ½ cup chocolate chips
- ½ cup festive sprinkles
Instructions
- Preheat oven to 350°F (175°C). Line a 9×13 inch baking pan with parchment paper.
- In a large bowl, whisk together melted butter, brown sugar, and granulated sugar until smooth.
- Mix in the eggs and vanilla extract.
- Stir in the flour, baking soda, and salt until combined.
- Fold in the M&Ms, chocolate chips, and sprinkles.
- Spread the dough evenly into the prepared baking pan.
- Bake for 22–28 minutes, or until the edges are golden and the center is set.
- Let cool completely before slicing into bars.
Notes
- Add extra M&Ms on top before baking for a more festive look.
- Underbake slightly for extra soft and chewy bars.
- Prep Time: 10 minutes
- Cook Time: 25 minutes
- Category: Dessert
- Method: Bake
- Cuisine: American
Conclusion
These Christmas Cookie Bars are a festive, colorful, and delicious treat that captures the spirit of the holiday season in every bite. With simple ingredients, easy preparation, and delightful flavor, they’re perfect for anyone looking to bake something impressive without spending hours in the kitchen. The buttery base, rich mix-ins, and sprinkle-filled design make them a hit at every gathering. Whether you’re preparing gifts, hosting a holiday buffet, or baking with family, these cookie bars bring warmth, joy, and irresistible sweetness to your celebration.